Friday, September 9, 2022
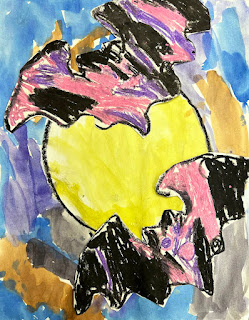
GEOMETRIC BATS
Geometric Bats

Learning Targets
I can...
- Create an original Geometric Bats using drawing techniques learned in class
- Use line types (horizontal, vertical, diagonal), shape variation (geometric, organic, free form), and color (tint, hue, shade) inspired by Graphic Artist (1896-1972) M.C. Escher
- Use value (lightness, darkness) and design principles (composition, movement, balance) based on Graphic Art
- Define Silhouette (an image or design in a single hue and tone)
Lesson One
Day One, Art Start
1. Circle Limit IV (1960) M.C. Escher

2. Read Stellaluna by Janell Cannon

3. Discussion Questions "What animal are you going to draw? What is the animal doing? What body covering does the animal have? What type of animal is it? Where could the animal be going? Is the animal happy or sad? What is the background of the image? What is behind the animal drawing? What is the largest mammal in the world? What animal is the tallest in the world? What is the slowest animal in th world? What animal has the longest life span? What is your favorite animal?"
Lesson Activities
1. Choose 8" X 12" Drawing Paper
2. Add line types (horizontal, vertical, diagonal) to the positive space (animal) of the bat paintings
3. Outline line types (horizontal, vertical, diagonal) with neutral colors (black, grey, brown) for the positive space (animal) of the Geometric Bats
Day Two, Art Start
1. Retrieve Geometric Bats for Assigned Tables
2. Lizard, Fish, Bats (1952) M.C. Escher

3. Discussion Questions "What types of lines are being used in this artwork? What area of the artist is emphasized by the artist? Which area of the artwork is most important? How does your eye move though the artwork? What choices did the artist make to make that happen? How would you describe this artwork to someone who has never seen it? How do you think this artwork was made? What emotions do you feel when looking at this? What emotions do you notice in the artwork? What do you think is happening next? How do you think the artist was feeling when he created this artwork? What title would you give this artwork? What symbols do you notice in the artwork? What do you like about this artwork?"
Lesson Activities
1. Use warm colors (red orange yellow) to fill in the positive space (animal) of the bat paintings
2. Use cool colors (blue green purple) to fill in the negative space (background) of the bat paintings
3. Use embellishments (plastic eyes, brown paper, glitter) to fill in the positive space (animal) of the Geometric Bats
Day Three, Art Start
1. Retrieve Geometric Bats for Assigned Tables
2. Set Up Studio Area (paint brushes, water buckets, tempera paint)
Lesson Activities
1. Add highlights (reflective light, light source) to fill in the positive space (animal) of the bat paintings
2. Add shadows (cast shadow, reflective shadow) to fill in the negative space (background) of the bat paintings
3. Add details (spots eyelashes, talons) to the positive space (animal) of the Geometric Bats
Artist Examples
 Student Examples



Saturday, September 5, 2020
MAGRITTES EYES
Magritte's Eye

Learning Targets
I can...
- Create an original Magritte's Eye using drawing techniques learned in class
- Use line types (horizontal, vertical, diagonal), shape variation (geometric, organic, free form) and space (positive, negative) inspired by Surrealist Artist (1898-1967) Rene Magritte
- Use drawing techniques (gesture, figure, contour) and design principles (composition, balance, proportion) based on Surrealism
- Define Juxtaposition (two things being seen or placed close together with contrasting effects)
Lesson One
Day One, Art Start
1. The False Mirror (1928) Rene Magritte

2. Read Magritte's Imagination by Susan Goodman Rubin

3. Discussion Questions "What kinds of objects did Rene Magritte include in his artwork? Where were these objects placed in his artwork? What is the point of this artwork? Why are the clouds in the reflection of the eyes? What might have happened in this painting if three more were added? What is dream like about this artwork? Which painting did Rene Magritte see that sent his art in a new direction? In what category of art is Rene Magritte's work classified? What common household items is featured in Rene Magritte's paintings? What new style of painting did Rene Magritte adopt? Which eye-confusing artistic concept is being used in this painting?"
Lesson Activities
1. Choose 12" by 15" Drawing Paper
2. Use pencil to draw shape variation (geometric, organic, free form) of face parts (nose, forehead, cheek) of eye drawing
3. Use pencil to draw shape variation (geometric, organic, free form) of eye parts (iris, pupil, eyelid, treat duck) of eye drawing
Day Two, Art Start
1. Retrieve Magritte's Eye for Assigned Table
2. Eye Color (1946) M.C. Escher

3. Discussion Questions "What makes these art pieces fit surrealism? What images seem dreamlike, fantasy, or relate to your own life? Who is the artist we are learning about? What do you think Rene Magritte was thinking when he painted The False Mirror? What do you think the title, The False Mirror, is supposed to tell us? Is the sky a reflection of what the eye is seeing? Is the eye in fact an opening into another reality? Are we looking at an inner vision or something else entirely? Did the artist draw the parts of the eye? What is surrealism? How can surrealism be incorporated into these drawings? What does that mean? How can we make the ordinary look extraordinary?"
Lesson Activities
1. Use neutral colors (black, brown, grey) to fill in the positive space (eye) of the eye drawings
2. Use neutral colors (black, brown, grey) to fill in the negative space (facial feature) of the eye drawings
3. Use line types (horizontal, diagonal, vertical) to fill in the positive space (eye) with dreamlike imagery for Magritte's Eyes
Day Three, Art Start
1. Retrieve Magritte's Eyes for Assigned Table
2. Set Up Studio Area (colored pencils, sharpeners, erasers)
Lesson Activities
1. Add highlights (light source, reflective light) to positive space (eye) of ones eye drawings
2. Add shadows (cast shadow, shadow) to negative space (background) of ones eye drawings
3. Use stop motion program (iMotion, FlipaClip, Stop Motion) to add an animation to ones Magritte's Eyes
Artist Examples


 Student Examples


Monday, August 31, 2020
SPORTS SPHERES
Sports Spheres

Learning Targets
I can...
- Create an original Sports Sphere using painting techniques learned in class
- Use shape variation (geometric, organic, free form), form (two dimensional, three dimensional), and value (lightness, darkness) inspired by Dutch Artist (1898-1972) M.C. Escher
- Use shading techniques (hatching, short dashes, circulism, blending) and design principles (composition, gradation, repetition) based on Realism
- Define Sphere (a three dimensional figure with no edges, corners, and center point)
Lesson One
Day One, Art Start
1. Three Spheres II (1946) M.C. Escher

2. Read Spheres by Nancy Furstigener

3. Discuss Questions "What visual information disappears when I squint at the sphere? How does the contrast in the scene change when I squint? Does anyone know what we call this shape? What can you tell me about this shape? Are ball, circle, and sphere the same or different? What is the difference between a ball, circle, and sphere? What is the role of art? How can art affect people's daily lives as they encounter it in public space? How should art speak to people outside of a museum or gallery? Who do artist make their artwork for? What constitutes a public and what constitutes public space? How do we respond to the crisis of the limited audience for art and art institutions? How should art speak to the public and through what means?"
Lesson Activities
1. Use three geometric shapes (circle, oval) to create a three-dimensional sphere for sphere drawings
2. Use line variation (thick, thin) to show type of object (baseball, basketball, bowling ball) for sphere drawings
3. Use complementary colors (red green; orange blue; purple yellow) to fill in positive space (object) of Sports Sphere
Day Two, Art Start
1. Retrieve Sports Sphere for Assigned Table
2. Three Spheres I (1945) M.C. Escher

3. Discussion Questions "What type of lines are being used in this artwork? How did this artist use space? How does your eye move through this artwork? What elements of this artwork seem real? What adjectives would you use to describe this artwork? What verbs would you use to describe this artwork? What do we know about the artist after viewing this artwork? If you could ask the artist a question, what would you ask him? What do you think this artwork was created for? How do you think this artwork was made? Why do you think the artist created this work? What do you think the artist is trying to say in this work? What is the meaning or message?"
Lesson Activities
1. Use complementary colors (red green; blue orange; yellow purple) to fill in the negative space (background) of the sphere drawing
2. Add patterns (dots, stripes, wavy) to fill in the negative space (background) of the sphere drawing
3. Use neutral colors (white) to fill in the highlights (reflective light, light source) of the Sports Spheres
Day Three, Art Start
1. Retrieve Sports Spheres for Assigned Table
2. Set Up Studio Area (water bucket, paint brush, watercolor)
Lesson Activities
1. Use neutral colors (black) to fill in the shadows (cast shadow, shadow) of the sphere drawings
2. Add tints (reflective light, light source) to subject matter (sphere) of sphere drawings
3. Use drawing tools (pencils, oil pastel, chalk) to add details to the Sports Spheres
Artist Examples


 Student Examples


Saturday, November 2, 2019
IMPOSSIBLE FORM STACKS
Impossible Form Stacks

Learning Targets
I can...- Create an original Impossible Form Stack using drawing techniques learned in class
- Use complimentary colors (blue, orange; red, green; purple, yellow), form (cube, cylinder, cone, sphere), and value (highlight, shadow, core shadow) inspired by Dutch Artist (1898-1972) M.C. Escher
- Understand shading techniques (highlight, mid tone, core shadow, cast shadow) and design principles (proportion, balance, movement) based on Realism
- Define Form (an object having length, width, and depth that is in an enclosed space)
Lesson One
Day One, Art Start
1. Three Spheres ll (1946) M.C. Escher
2. Read Making Art: Form and Meaning by Terry Barrett

Lesson Activities
1. Choose 12" X 15" Construction Paper2. Draw Five Basic Forms (cone, cylinder, sphere, cube, torus) before adding light, middle, and dark values within the Impossible Form Stacks
3. Add an horizon line in the background to separate the five basic shapes from the background to separate the five basic shapes from the background (wallpaper, table) of the Impossible Form Stacks
Reminder:
- Initials & Home Teacher on Back of paper
Day Two, Art Start
1. Retrieve Impossible Form Stacks for Assigned Table2. Impossible Cube (1922) M.C. Escher

Lesson Activities
1. Use complimentary colors (blue, orange; red, green; purple, yellow) to fill in the positive space (cone, cylinder, sphere, cube, torus) of the Impossible Form Stacks2. Use complimentary colors (blue, orange; red, green; purple, yellow) to fill in the negative space (wallpaper, table) of the Impossible Form Stacks
3. Use a felt tip pen to add contour lines to the positive/negative space of the Impossible Form Stacks
Day Three, Art Start
1. Retrieve Impossible Form Stacks for Assigned Table2. Set Up Studio Area (pencils, kneaded erasers, white chalk)
Lesson Activities
1. Add tints (add white, reflective light, light source) to subject matter (cones, cylinders, spheres, cube, torus) of the Impossible Form Stacks2. Add shades (add black, cast shadows, shadow) to background (wallpaper, table) of the Impossible Form Stacks
3. Use drawing tools (pencils, oil pastel, chalk) to add details to the Impossible Form Stacks
Teacher Demonstration Video
Artist Examples


Student Examples


 Posts
Posts

