Friday, November 17, 2023
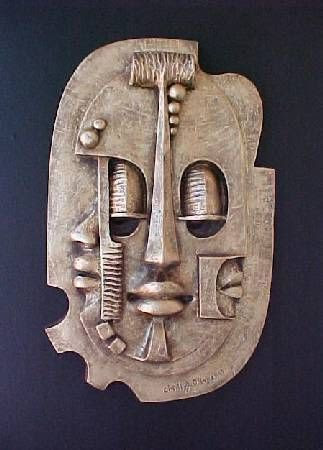
PAOLOZZI RELIEF SCULPTURES
Paolozzi Relief Sculptures

Learning Targets
I can...
- Create an original Paolozzi Relief Sculptures using sculptures techniques learned in class
- Use line types (horizontal, vertical, diagonal), shape variation (geometric, organic, free form), and space (positive, negative) inspired by Scottish Artist (1924-2005) Sir Eduardo Paolozzi
- Use paper methods (cutting, folding, binding, layering) and design principles (balance, contrast, proportion) based on Pop Art
- Define Identity (the qualities, beliefs, personality traits, appearance, and expressions that characterize a person or group)
Lesson One
Day One, Art Start
1. Head (1993) Eduardo Paolozzi

2. Read Eduardo Paolozzi by Judith Collins

3. Discussion Questions "Who was Eduardo Paolozzi? Can you find the following items in this Paolozzi collage? What is a relief sculpture? How can everyday materials and simple paper be used to create a relief sculpture? What does this sculpture communicate about the people who made it? What does this artwork communicate about the culture? What might sculpture, and art in general, tell us about the time, places, and culture they come from? What does your sculpture tell people about you, your time, your place, and your culture? What do these sculptures say, and how do they talk to each other? Is this sculpture a high or a low relief sculpture? Is one more than the other? What do you notice about this relief sculpture? Who or what is featured on this relief sculpture?"
Lesson Activities
1. Add lines (horizontal, vertical, diagonal) for the proportion (head, neck, shoulder) within the silhouette of the portrait sculptures
2. Turn cardboard pieces into basic shapes (oval face, crescent ears, rectangle neck) for the positive space (face) of the portrait sculptures
3. Use needle tools to draw facial features (oval eyes, round nose, thin mouth) within the silhouette of the Paolozzi Relief Sculptures
Day Two, Art Start
1. Retrieve Paolozzi Relief Sculptures for Assigned Tables
2. Mechanized Head (1993) Eduardo Paolozzi

3. Discussion Questions "How do artists communicate ideas? Why did the artist use symmetrical pieces? what was the artist inspired by? What is the difference between relief sculpture and a sculpture in the round? What elements and principles did the artist use in his sculpture? Who wears many faces? What does this mean? How do individuals who were different faces represent this in his or her life? How do you bond pieces of cardboard together? How do you know a piece of artwork is finished? Why do artists create self portraits? Does the way a person is sitting or standing tell you anything about them? What makes this portrait unique? Do you like the way the artist arranged the portrait? What does the background and the objects in the background of the picture tell us?"
Lesson Activities
1. Add line types (horizontal, vertical, diagonal) within the positive space (silhouette) of the portrait sculptures
2. Turn cardboard pieces into basic shapes (oval face, crescent ears, rectangle neck) of the portrait sculptures
3. Use needle tools to draw facial features (oval eyes, round nose, thin mouth) with the positive space (silhouette) of the Paolozzi Relief Sculptures
Day Three, Art Start
1. Retrieve Paolozzi Relief Sculptures for Assigned Tables
2. Set Up Studio Area (glue sticks, scissors, cardboard, tempera paint)
Lesson Activities
1. Add color combinations (analogous, complementary, secondary) to the positive space (neck, head, shoulder) of the portrait sculptures
2. Add color combinations (analogous, complementary, secondary) to the negative space (background) of the portrait sculptures
3. Apply Gloss Finish to the face proportions, facial features, and accessories of the Paolozzi Relief Sculptures
Artist Examples


 Student Examples



Monday, October 24, 2022
SPLATTER PAINTED WOLVES
Splatter Painted Wolves

Learning Targets
I can...
- Create an original Splatter Painted Wolves using painting techniques learned in class
- Use neutral colors (brown, black, grey), shape variation (geometric, organic, free form), and texture (smooth, rough, bumpy, soft) inspired by The Wolf, The Duck, and The Mouse by Marc Barnette
- Use multimedia techniques (text, audio, video, animation) and design principles (harmony, contrast, balance) based on Children Book Illustrations
- Define Layers (a technique involving overlapping materials to cover a whole surface)
Lesson One
Day One, Art Start
1. A Lonely Wolf (1890) Alfed Von Wierusz-Kowalski

2. The Wolf, The Duck, and The Mouse by Jon Klassen

3. Discussion Questions "How do wolves communicate with each other? What are the differences between these types of howls? How is family life for a wolf like that of a human? How do wolves help the environment? Why is it important that the wolves be reintroduced to Yellowstone National Park? Why are wolves considered predators? Why do wolves kill sheep and other livestock? What is the Wolf Reintroduction Program trying to accomplish? Who are the organizations and people involved in reintroducing the wolves? Where, when, and how were the wolves reintroduced in Yellowstone? Why are many of the local ranchers opposed to the wolves being reintroduced? Can people and wolves live together peacefully?"
Lesson Activities
1. Use graphite pencil to draw the negative space (background, sky, clouds, hillside) of the wolf paintings
2. Use graphite pencil to draw in the positive space (middle ground, wolves, moon) of the wolf paintings
3. Use graphite pencil to draw in the positive space (foreground, bushes, trees) of the wolf paintings
Day Two, Art Start
1. Retrieve Splatter Painted Wolves for Assigned Table
2. Wolves In Snowstorm (1880) Alfred Von Wierusz-Kowalski

3. Discussion Questions "What does this scene tell us about the area of the country in which the artist lived in? How has art been influenced by elements of artists lives? How does this artwork reflect the community? What kind of scenes were the subjects of these artists? How does this work differ from the artwork of other artists during the same era? How many lines are in this artwork? What do you known about the artist's culture, past, and present? How are the arts inspired by different cultures as well as their own? What types of art does the author create? What do you see in this artwork? What types of colors does the artist use? What moods do these paintings evoke? How do you feel when you see the art? What does the artwork remind you of?"
Lesson Activities
1. Add line types (horizontal, vertical, diagonal) to the negative space (background, sky, clouds, hillside) of the wolf paintings
2. Add line types (horizontal, vertical, diagonal) to the positive space (middle ground, wolves, moon) of the wolf paintings
3. Add line types (horizontal, vertical, diagonal) to the positive space (foreground, bushes, trees) of the wolf paintings
Day Three, Art Start
1. Retrieve Splatter Painted Wolves for Assigned Table
2. Set Up Studio Area (paint brushes, tempera paint, water bucket)
Lesson Activities
1. Use neutral colors (black, brown, grey) to paint in the negative space (background, sky, clouds, hillside) of the wolf paintings
2. Use neutral colors (black, brown, grey) to paint in the positive space (middle ground, wolves, moon) of the wolf paintings
3. Use neutral colors (black, brown, grey) to paint in the positive space (foreground, bushes, trees) of the wolf paintings
Artist Examples


 Student Examples


Monday, December 14, 2020
PAPER MOLAS
Paper Molas

Learning Targets
I can...
- Create an original Paper Molas using drawing techniques learned in class
- Use shape variation (geometric organic free form), space (positive negative), and texture (smooth rough) inspired by the Kuna people from Panama, Central America
- Use quilting techniques (reverse applique, stitching, layering) and design principles (composition balance repetition) based on Traditional Art
- Define Molas (cloth panels that form parts of a blouse for Kuna in Panama)
Lesson One
Day One, Art Start
1. Mola Blouse With Geometric Design (1913) Hyatt Verrill

2. Read "The Art Of Being Kuna: Layers of Meaning Among the Kuna Woman's Art" by Mari Salvador

3. Discussion Questions "Does it take a long time to make a mola? What can you tell about the Kuna Indians just from seeing photos of them and their Mola Art? What do you think their lives are like? If women make the Molas, what are the jobs of the men on the San Bias Islands? What type of images are not found? What images are found in Molas? Why are these images used? What materials are used? How are the backgrounds of Molas designed? How are patterns used in Molas? Why is color important to Molas? What was the purpose for creating Molas? Why is color important to Molas? What was the purpose for creating Molas? How did you make your art? What tools, materials, and techniques did you use? What is one thing you are proud of in your artwork? What is one thing you would change about your artwork?"
Lesson Activities
1. Choose 12"X 15" Drawing Paper
2. Draw three thumbnail sketches of paper cut outs using drawing techniques (outline contour continuous) for flower cut outs
3. Add symbols (star shaped medallions, flowers, themes). to positive space (flower) of Paper Molas
Day Two, Art Start
1. Retrieve Paper Molas for Assigned Table
2. Mola Blouse With Red And Orange Geometric Design Over Plaid Fabric (1922) Mitchell Hedges

3. Discussion Questions "What is the story being told, if any? What do you think happened before this scene? What do you think happened next? How do you think the artist was feeling when they created this artwork? How did the artist line, shape, and color to contribute to the mood or meaning? What title would you give this artwork? What symbols do you notice in the artwork? What does this artwork remind you of? What do you personally relate to or connect with in this picture? How might you feel differently about the world after looking at this picture? What does this artwork say about the culture in which it was produced? How do you think this artwork was used by the people who made it? What was its function?"
Lesson Activities
1. Use paper techniques (folding cutting layering) to add basic shapes (geometric organic free form) to flower cut outs
2. Use paper techniques (folding cutting layering) to fill in the positive space (flower) of the flower cut outs
3. Use paper techniques (folding cutting layering) to add details (glitter star shaped medallions, flowers) to positive space (flower) of Paper Molas
Day Three, Art Start
1. Retrieve Paper Molas for Assigned Table
2. Set Up Studio Area (construction paper, scissors, glue sticks)
Lesson Activities
1. Use symbolic colors (white black yellow green brown) to fill in the negative space (background) of flower cut outs
2. Use symbolic colors (white black yellow green brown) to fill in the positive space (flower) of the flower cut outs
3. Add design details (star snow raindrops) to the positive space (flower) of the Paper Molas
Artist Examples


 Student Examples


 Posts
Posts

