Thursday, August 20, 2026
ART MUSEUM SCULPTURES
Art Museum Sculptures Learning Targets

I can...
- Create an original Art Museum Sculpture using drawing techniques learned in class
- Use shape variation (geometric, organic, free form), form (two dimensional, three dimensional), and texture (actual visual implied) inspired by Chinese American Architect (1917-2019) I.M. Pei
- Use sculpture techniques (carving, casting, assembling, modeling) and design principles (proportion, movement, composition) based on Modern Architecture
- Define Museum (a public or private non-profit institution that collects, preserves, studies, and exhibits works of visual art for entertainment)
Lesson One
Day One, Art Start
1. Louvre Pyramid (1983-1984) I.M.Pei

2. Read The Glass Pyramid: A Story Of The Louvre Museum And Architect I.M.Pei by Jeannie Walker Harvey

3. Discussion Questions "What do museums want people to learn and why? Who are museums hoping to attract and why? Are there any culturally significant objects you would include in your museum? Is there an item passed down from your family or an item from your home country you could include? How can you document the important information about each item? Did you know most museums record the date it was collected, where the artwork came from, and a brief description of the object? How does visiting museums help motivate us to learn more about art history? What are the colors, shapes, and objects you can see without giving any facts? Why is touching artwork forbidden and how do guards protect the work for the future? How can buildings reflect the relationship between people and the environment?"
Lesson Activities
1. Choose Three 12 X 12 Cardboard Sheets
2. Use three compositional elements (shape, color, texture) to represent a memory, place, or event from ones own heritage
3. Use line variation (wavy, straight, curved) as a design principle (balance, movement, repetition) with the Art Museum Sculptures
Day Two, Art Start
1. Retrieve Art Museum Sculptures For Assigned Tables
2. Rock And Roll Hall Of Fame (1995) I.M. Pei

3. Discussion Questions "What do you notice about this art museum building? How would you describe it to someone who has never seen it? What do you see that makes you say that? What details might have been inspired by nature or ancient civilizations? What might this museum suggest about the relationship between local people and their environment? What evidence supports your ideas? What might this suggest about your communities outlook on the natural world? How does each work of art reflect the natural world? How does your building look from different sides? How do visitors walk through this museum? What is the mood of your museum, and how will your building shape reflect that? Will your building be historical and classical, or sleek and modern? How will people enter your museum? What makes your building look like a museum rather than an office building, home, or school?"
Lesson Activities
1. Use compass, protractors, and texture plates to add symmetrical shapes (circle, triangles, squares) to the Art Museum Sculptures
2. Use form (two dimensional, three dimensional) to fill in the positive space (foreground, middle ground) of the Art Museum Sculptures
3. Use form (two dimensional, three dimensional) to fill in the negative space (background) of the Art Museum Sculptures
Day Three, Art Start
1. Retrieve Art Museum Sculptures for Assigned Tables
2. Set Up Studio Area (washable markers, glue sticks, scissors, colored pencils)
Lesson Activities
1. Use scissors to cut out two dimensional symmetrical shapes (circles, triangles, squares) to create a three dimensional Art Museum Sculptures
2. Glue Down three dimensional symmetrical shapes (circles, triangles, squares) to create a three dimensional Art Museum Sculptures
3. Add decorations (old art, newspaper, fabric scraps, colored paper, buttons, collage) to positive space (foreground, middle ground) of the Art Museum Sculptures
Artist Examples


 Student Examples


Tuesday, November 11, 2025
PAULINE LOCTIN ABSTRACT COLLAGES
Pauline Loctin Abstract Collages Learning Targets

I can...
- Create an original Pauline Loctin Abstract Collages using drawing techniques learned in class
- Use shape variation (geometric organic free form), form (two dimensional three dimensional), and texture (actual visual implied) inspired by Multidisciplinary Sculptor (2003-Present) Pauline Loctin
- Use pleating techniques (hand folding, machine folding, heat pressing, box pleats, inverted pleats) and design principles (composition, variation, balance) based on Paper Sculpture
- Define Nonrepresentational Art (a type of visual art that does not depict objects, people, or scenes from the real world)
Lesson One
Day One, Art Start
1. The Flow Of Emotional Numbness (2023) Pauline Loctin

2. Read Dreams by Ezra Jacks Keats

3. Discussion Questions "Are the colors placed throughout the artwork to create a visual balance? Does one square look too heavy? Are the varied shapes working well together? How do artists deconstruct and reconstruct artwork? How does the artist transform flat paper into three dimensional sculptural forms? What type of sensory experience and feelings do these forms convey? What color do you think would be fun to use if you were making artwork like the artist? How do you think the artist make a flat piece of paper stand up and keep shape? Did you know the artist was a musician who played the violin for a long time? Do you think learning music can help with making artwork? Do you think artists have create freedom when making artwork? What story do you think this piece of art is telling? If you had an unlimited supply of paper in any color, what amazing sculpture creation would you make?"
Lesson Activities
1. Choose 12" X 15" Drawing Paper
2. Draw three line types (horizontal, vertical, diagonal) as a line design for the abstract collages
3. Outline three line types (horizontal, vertical, diagonal) with black oil pastels for the Pauline Loctin Abstract Collages
Day Two, Art Start
1. Retrieve Pauline Loctin Abstract Collages for Assigned Tables
2. Chromatic Reflection (2023) Pauline Loctin

3. Discussion Questions "What does art mean to you? What ideas, concerns, or objects have motivated your work? How would you describe your artistic style? What is success or successful to you? Is there ea distinct mood? Does it make you think about anything? Does anything jump out at you? What did the artist say about the piece? How did you start out as an artist? When do you feel your best? Do you still struggle with comparison to other artists? If so, how are you able to move past this? What do your paintings reveal bout your personality? Where or how do you rediscover inspiration? Who is the artist shown above? What do you think the artist is thinking about when working on this sculpture? How do artists know when an artwork is complete? What do you think the origin of the titles say about the artwork? How do you think the artist feels about sculpture?"
Lesson Activities
1. Use drawing techniques (contour outline continuous) to add basic shapes (geometric organic free form) to the positive space (foreground) of the Pauline Loctin Abstract Collages
2. Use drawing techniques (contour outline continuous) to add basic shapes (geometric organic free form) to the negative space (background) of the Pauline Loctin Abstract Collages
3. Use drawing techniques (contour outline continuous) to add details (patterns texture designs) to the Pauline Loctin Abstract Collages
Day Three, Art Start
1. Retrieve Pauline Loctin Abstract Collages for Assigned Tables
2. Set Up Studio Area (glue sticks, scissors, construction paper)
Lesson Activities
1. Use complementary colors (red green, blue orange, yellow purple) to fill in the positive space (foreground, middle ground) of the Pauline Loctin Abstract Collages
2. Use complementary colors (red green, blue orange, yellow purple) to fill in the negative space (background) of the Pauline Loctin Abstract Collages
3. Add design details (pattern texture designs) to the positive space (foreground) of the Pauline Loctin Abstract Collages
Artist Examples 


 Student Examples


Friday, November 17, 2023
PAOLOZZI RELIEF SCULPTURES
Paolozzi Relief Sculptures

Learning Targets
I can...
- Create an original Paolozzi Relief Sculptures using sculptures techniques learned in class
- Use line types (horizontal, vertical, diagonal), shape variation (geometric, organic, free form), and space (positive, negative) inspired by Scottish Artist (1924-2005) Sir Eduardo Paolozzi
- Use paper methods (cutting, folding, binding, layering) and design principles (balance, contrast, proportion) based on Pop Art
- Define Identity (the qualities, beliefs, personality traits, appearance, and expressions that characterize a person or group)
Lesson One
Day One, Art Start
1. Head (1993) Eduardo Paolozzi

2. Read Eduardo Paolozzi by Judith Collins

3. Discussion Questions "Who was Eduardo Paolozzi? Can you find the following items in this Paolozzi collage? What is a relief sculpture? How can everyday materials and simple paper be used to create a relief sculpture? What does this sculpture communicate about the people who made it? What does this artwork communicate about the culture? What might sculpture, and art in general, tell us about the time, places, and culture they come from? What does your sculpture tell people about you, your time, your place, and your culture? What do these sculptures say, and how do they talk to each other? Is this sculpture a high or a low relief sculpture? Is one more than the other? What do you notice about this relief sculpture? Who or what is featured on this relief sculpture?"
Lesson Activities
1. Add lines (horizontal, vertical, diagonal) for the proportion (head, neck, shoulder) within the silhouette of the portrait sculptures
2. Turn cardboard pieces into basic shapes (oval face, crescent ears, rectangle neck) for the positive space (face) of the portrait sculptures
3. Use needle tools to draw facial features (oval eyes, round nose, thin mouth) within the silhouette of the Paolozzi Relief Sculptures
Day Two, Art Start
1. Retrieve Paolozzi Relief Sculptures for Assigned Tables
2. Mechanized Head (1993) Eduardo Paolozzi

3. Discussion Questions "How do artists communicate ideas? Why did the artist use symmetrical pieces? what was the artist inspired by? What is the difference between relief sculpture and a sculpture in the round? What elements and principles did the artist use in his sculpture? Who wears many faces? What does this mean? How do individuals who were different faces represent this in his or her life? How do you bond pieces of cardboard together? How do you know a piece of artwork is finished? Why do artists create self portraits? Does the way a person is sitting or standing tell you anything about them? What makes this portrait unique? Do you like the way the artist arranged the portrait? What does the background and the objects in the background of the picture tell us?"
Lesson Activities
1. Add line types (horizontal, vertical, diagonal) within the positive space (silhouette) of the portrait sculptures
2. Turn cardboard pieces into basic shapes (oval face, crescent ears, rectangle neck) of the portrait sculptures
3. Use needle tools to draw facial features (oval eyes, round nose, thin mouth) with the positive space (silhouette) of the Paolozzi Relief Sculptures
Day Three, Art Start
1. Retrieve Paolozzi Relief Sculptures for Assigned Tables
2. Set Up Studio Area (glue sticks, scissors, cardboard, tempera paint)
Lesson Activities
1. Add color combinations (analogous, complementary, secondary) to the positive space (neck, head, shoulder) of the portrait sculptures
2. Add color combinations (analogous, complementary, secondary) to the negative space (background) of the portrait sculptures
3. Apply Gloss Finish to the face proportions, facial features, and accessories of the Paolozzi Relief Sculptures
Artist Examples


 Student Examples


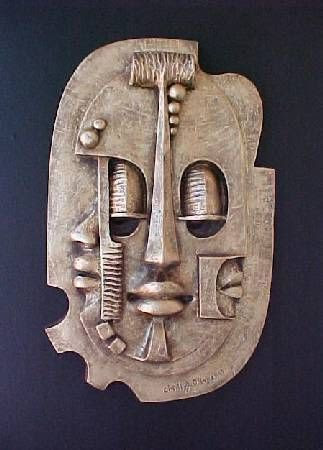

Friday, October 27, 2023
PAPER QUILLING RELIEF SCULPTURES
Paper Quilling Relief Sculptures

Learning Targets
I can...
- Create an original Paper Quilling Relief Sculpture using sculpture techniques learned in class
- Use line types (horizontal, vertical, diagonal), form (two dimensional, three dimensional), and texture (actual, visual, implied) inspired by Paper Illustrator (1983-Present) Yulia Brodskaya
- Use paper techniques (coils, scrolls, waves, diamonds) and design principles (composition, movement, contrast) based on Modern Art
- Define Quilling (the art of manipulating and arranging small strips of paper into detailed designs)
Lesson One
Day One, Art Start
1. The Heart Alchemist (2023) Yulia Brodskaya


2. Read Paper Quilling Chinese Style by Paper Arts Museum Zhu Ligun

3. Discussion Questions "What shapes can you identify in this composition? How might you be able to get sharp corners in quilled paper? What kinds of designs can you imagine with quilled paper? What are some common things that we find in the springtime? What things in nature are a sign of spring? Are there animals or insects that you see in springtime? How long do you think it took the artist to learn how to paper quill? What type of quilling tools do artists use to create artwork? How do you know what size to make loose coils? What do artists use to coat the finished quilling? How do artists store quilling paper? How can you make something look three dimensional? How many different ways can you fold paper? Can you work as a team to complete the sculpture?"
Lesson Activities
1. Choose 12" by 15" Colored Construction Paper
2. Use three compositional elements (shape, color, texture) to represent a memory, place, or even for the paper sculptures
3. Use line variation (coils, scrolls, waves, diamonds) as a design principle (balance, movement, repetition) within the Paper Quilling Relief Sculptures
Day Two, Art Start
1. Retrieve Paper Quilling Relief Sculptures for Assigned Tables
2. Vrubel Tribute (2023) Yula Brodskaya


3. Discussion Questions "What do you think is happening in this composition? How does this work make you feel? What do you see in this sculpture? How would you describe the composition? Does this work look natural, representational, or is it stylized? What materials were on hand for the creation of this artwork? What does this tell us about the environment in which it was made? Who is the artist of each sculpture? What do you know about this artist? What medium was it done with? Why was it made, is it known? For what purpose or use does the sculpture have? What feeling was each artist trying to convey? How did the artist accomplish this composition? What do these sculptures reveal about the artist or style? What does the sculpture represent? What do you think is happening in this sculpture?"
Lesson Activities
1. Use compasses, protractors, and texture plates to add symmetrical shapes and expressive lines to the paper sculptures
2. Use color combinations (neutral colors, analogous colors, metallic colors) to fill in the negative space (background) of the paper sculptures
3. Use color combinations (neutral colors, analogous colors, metallic colors) to fill in the positive space foreground) of the Paper Quilling Relief Sculptures
Day Three, Art Start
1. Retrieve Paper Quilling Relief Sculptures for Assigned Tables
2. Set Up Studio Area (glue sticks, construction paper, scissors)
Lesson Activities
1. Use scissors to cut out two dimensional shapes (circle, diamond, oval, triangle) to create the positive space (foreground) of the paper sculptures
2. Glue down three dimensional shapes (cylinder, cone, sphere) to create the positive space (foreground) of the paper sculptures
3. Use sharpie markers to add beautiful patterns (hearts, swirls, dots, stripes) within the positive space (foreground) of the Paper Quilling Relief Sculptures
Artist Examples


 Student Examples


Thursday, September 28, 2023
PICASSO PAPER CUT OUTS
Picasso Paper Cut Outs

Learning Targets
I can...
- Create an original Picasso Paper Cut Outs using drawing techniques learned in class
- Use shape variation (geometric, organic, free form), form (two dimensional, three dimensional), and texture (actual, implied, visual) inspired by Spanish Artist (1881-1972) Pablo Picasso
- Use sculpture techniques (carving, assembling, modeling, casting) and design principles (composition, proportion, balance) based on Cubism
- Define Interconnect (having different parts or things connected or related to each other)
Lesson One
Day One, Art Start
1. Woman (1943) Pablo Picasso

2. Read Picasso Cut Papers by Cythnia Burlingham

3. Discussion Question "Did you know Pablo Picasso painted on vessels? Did you know Pablo Picasso made giant sculptures out of stone, steel, and cardboard? Do you notice how the artist used monochromatic colors to have the face looking in different directions? How many faces can be seen and how does each face feel? How did Cubist artists use collage to discuss the relationship between different people? What two animals did we see that are cut out of the paper? What is the mood in this paper sculpture? What would the impact of this work be if it were in color instead of black and white? How is this artwork similar and different to photographs?"
Lesson Activities
1. Add line types (horizontal, vertical, diagonal) for the proportion (head, neck, shoulder) within the silhouette of the face paper sculptures
2. Turn construction paper into basic shapes (oval face, crescent ears, rectangle neck) for the positive space (face) of the face paper sculptures
3. Use tools (scissors, glue sticks, pencils) to draw facial features (oval eyes, round nose, thin mouth) within the silhouette of the Picasso Paper Cut Outs
Day Two, Art Start
1. Retrieve Picasso Paper Cut Outs for Assigned Tables
2. Chair (1961) Pablo Picasso

3. Discussion Questions "What influenced Pablo Picasso's work? What is Cubism? where did Pablo Picasso grow up? Which political movements was Pablo Picasso associated with? Who invented Cubism with Pablo Picasso? Which political movements was Pablo Picasso associated with? Who invited Cubism with Pablo Picasso? When did Picasso start signing his artwork? How many works of art did Picasso create during his lifetime? How old was Pablo Picasso when he completed his first painting? Which is not a characteristic of Cubism? What is the name of this sculpture? What do you know about one of the greatest artists of the 20th century? What was the first of the most commonly accepted periods of Pablo Picasso's work?"
Lesson Activities
1. Add facial features (eyes, nose, mouth) to the positive space (face) of the silhouette of the face paper sculptures
2. Add details (eye sockets, brow bone, moles) to the facial features (eyes, nose, mouth) of the face paper sculptures
3. Use modeling tools (paddle, brush, grips) to smooth out facial features (eyes, nose, mouth) of the Picasso Paper Cut Outs
Day Three, Art Start
1. Retrieve Picasso Paper Cut Outs for Assigned Tables
2. Set Up Studio Area (scissors, glue sticks, pencils)
Lesson Activities
1. Add color combinations (analogous, complementary, secondary) to the positive space (neck, face, shoulder) of the face paper sculptures
2. Add color combinations (analogous, complementary, secondary) to the negative space (background) of the face paper sculptures
3. Apply Gloss Finish to the face proportions, facial features, and accessories of the Picasso Paper Cut Outs
Artist Examples


 Student Examples


 Posts
Posts

