Wednesday, October 1, 2025
LUNA MOTHS AT NIGHT
Luna Moths At Night
Learning Targets

I can...
- Create an original Luna Moths At Night using drawing techniques learned in class
- Use color combinations (glow in the dark, neutral colors, cool colors), shape variation (geometric, organic, free form), and value (lightness, darkness, shadows, highlights) inspired by England Artist (1963-Present) Sarah Gillespie
- Use printmaking techniques (relief stencil etching dry point) and design principles (composition proportion variation) based on Contemporary Art
- Define Glow In The Dark (a special paint or materials that absorb light to release as a visible glow when placed in the dark)
Lesson One
Day One, Art Start
1. Black Arches Moth (The Nun) (2020) Sarah Gillespie

2. Read The Girl Who Drew Butterflies: How Maria Merian's Art Changed Science by Joyce Sidman

3. Discussion Questions "Do you know Luna Moths only take flight at night, making them a rare and magical sight? Did you know Luna Moths are the largest moths in North America? Did you know adult moths only live a week and have no mouths? Can you imagine what the moth would look like flying at night? If you could have a moth as a pet, what would you do with it? What if this moth could glow in the dark? What color would it glow? Where do you think your moth lives? When you look at the moth's body, what does the texture (fluffy, smooth) look like? What kind of magical place does your Luna Moth live in such a secret garden, treasure grove, or magical forest? What adventures does the moth go on when everyone else is sleeping? Does the moth dance with fireflies or visit the moon?"
Lesson Activities
1. Choose 12 X 15 Painting Paper
2. Use neutral colors (black, grey, brown, white) to draw line types (horizontal, vertical, diagonal) for the positive space (foreground, moth) of the moth paintings
3. Use neutral colors (black, grey, brown, white) to outline the line types (horizontal, vertical, diagonal) for the positive space (foreground, moth) of the moth paintings
Day Two, Art Start
1. Retrieve Luna Moths At Night from Assigned Tables
2. Clouded Magpie (2024) Sarah Gillespie

3. Discussion Questions "What are the circles on the wings for? Are the fake eyes to trick a bat, or can the moth see out of them? Can the feathery antennae of the moth feel moonbeams? What is the best halloween treat that your moth can find? What kind of costume is your moth wearing for halloween? What kind of magic dust in the wings of your moth made from? If your moth could talk, what kind of stories would it tell? What does your moth see when it flutters around the pumpkin patch at night? Does your moth have a secret pattern on its wings that only appears in the moonlight? What if your moth was a king or queen of all other moths? What kind of ruler would it be? If your moth could change its colors what would it change them to?"
Lesson Activities
1. Add line variation (horizontal, vertical, diagonal) to add patterns (swirls, dots, stripes) to the positive space (foreground, moth) of the moth paintings
2. Use color combinations (cool colors, analogous colors, iridescent colors) for the positive space (foreground, moth) of the moth paintings
3. Use color combinations (cool colors, analogous colors, iridescent colors) for the negative space (background) of the moth paintings
Day Three, Art Start
1. Retrieve Luna Moths At Night for Assigned Tables
2. Set Up Studio Area (oil pastels, tempera paint, paint brushes, glue sticks)
Lesson Activities
1. Use value (lightness, darkness, highlights, shadows) for the positive space (foreground, moth) of the moth paintings
2. Use value (lightness, darkness, highlights, shadows) for the negative space (foreground, moth) of the moth paintings
3. Use texture (actual, visual, implied) to add details (wings, antennas, whiskers) to the positive space (foreground, moth) of the moth paintings
Artist Examples


 Student Examples


Wednesday, December 18, 2024
CARDBOARD STEAMPUNK MACHINES
Cardboard Steampunk Machines
 Learning Targets

I can...
- Create an original Cardboard Steampunk Machines using drawing techniques learned in class
- Use color combinations (metallic, earth tones, neutral colors), form (two dimensional, three dimensional) and texture (actual visual implied) inspired by Russian Sculptor (1987-Present) Igor Verny
- Use sculpture techniques (slots, tabs, folds, brackets) and design principles (balance, proportion, movement) based on Steampunk
- Define Kitbashing (art of making a sculpture by taking bits out of broken plastic toys, found objects, or recycled materials)
Lesson One
Day One, Art Start
1. Little Bird (2020) Igor Verny

2. Read How The Steam Locomotive And Steam Technology Work by Robert Lamb

3. Discussion Questions "How has the Victorian Era affected art, literature, culture, fashion, and technology? What is the difference between form and function? How has the Gilded Age brought forth change? Which one: form or function does Steampunk identify with the most? What is the most significant imagery in Steampunk? How is Steampunk portrayed? How does the Victorian Era set the stage for fashion and how is fashion design a form of art? How does the Steampunk art movement relate to us now and how will it relate to generations from now? How do authors, illustrators, filmmakers, and artists integrate technology and science fiction with art to create Steampunk? Who and what has influenced the art movement? How has Steampunk influenced other pursuits and studies?"
Lesson Activities
1. Choose Three 12 X 12 Cardboard Sheets
2. Use three compositional elements (shape color texture) to represent a memory, place, or event from ones own history
3. Use line variation (wavy, straight, curved) as a design principle (balance, proportion, composition) within ones own Cardboard Steampunk Machines
Day Two, Art Start
1. Retrieve Cardboard Steampunk Machines for Assigned Tables
2. Wasp (2018) Igor Verny

3. Discussion Questions "How has the use of steam made life easier for people throughout history? Can your sculptural piece embody the spirit of Steampunk? Did you know writings about imaginary spaceships can be traced to over 300 years ago? What structures today are similar to being in the air? What role does imagination play in science and vice versa? What fashion trends have influenced and contributed to steampunk fashion? How do thinkers and makers take inspiration from science fiction stories? How do artists have an impact on modern culture and future inventions?"
Lesson Activities
1. Use compass, protractor, and texture plates to add symmetrical shapes (circle, square, triangle) and expressive lines (thick, thin, straight, curved) to the cardboard machines
2. Use form (two dimensional, three dimensional) to fill in the positive space (animal, object, creature) of the cardboard machines
3. Add decorations (old newspaper, goggles, gears, bolts, screws) to the positive space (foreground) of the Cardboard Steampunk Machines
Day Three, Art Start
1. Retrieve Cardboard Steampunk Machines for Assigned Tables
2. Set Up Studio Area (glue bottles, cardboard, push pins, metallic paint)
Lesson Activities
1. Use scissors to cut out two dimensional shapes (circle, square, triangle) to create three dimensional shapes (cylinder, cone, pyramid) for the steampunk machines
2. Glue down three dimensional symmetrical shapes (cylinder, cone, pyramid) to create a three dimensional structure (cylinder, cone, pyramid) for the steampunk machines
3. Add decorations (old art, newspaper, colored paper) to the positive space (foreground) of the Cardboard Steampunk Machines
Artist Examples


 Student Examples


Friday, November 17, 2023
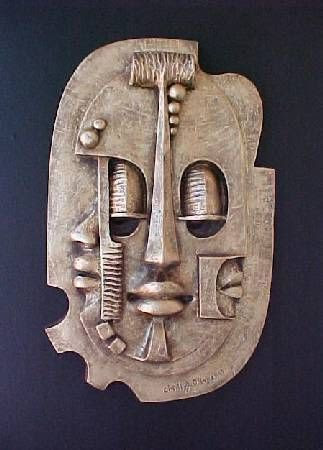
PAOLOZZI RELIEF SCULPTURES
Paolozzi Relief Sculptures

Learning Targets
I can...
- Create an original Paolozzi Relief Sculptures using sculptures techniques learned in class
- Use line types (horizontal, vertical, diagonal), shape variation (geometric, organic, free form), and space (positive, negative) inspired by Scottish Artist (1924-2005) Sir Eduardo Paolozzi
- Use paper methods (cutting, folding, binding, layering) and design principles (balance, contrast, proportion) based on Pop Art
- Define Identity (the qualities, beliefs, personality traits, appearance, and expressions that characterize a person or group)
Lesson One
Day One, Art Start
1. Head (1993) Eduardo Paolozzi

2. Read Eduardo Paolozzi by Judith Collins

3. Discussion Questions "Who was Eduardo Paolozzi? Can you find the following items in this Paolozzi collage? What is a relief sculpture? How can everyday materials and simple paper be used to create a relief sculpture? What does this sculpture communicate about the people who made it? What does this artwork communicate about the culture? What might sculpture, and art in general, tell us about the time, places, and culture they come from? What does your sculpture tell people about you, your time, your place, and your culture? What do these sculptures say, and how do they talk to each other? Is this sculpture a high or a low relief sculpture? Is one more than the other? What do you notice about this relief sculpture? Who or what is featured on this relief sculpture?"
Lesson Activities
1. Add lines (horizontal, vertical, diagonal) for the proportion (head, neck, shoulder) within the silhouette of the portrait sculptures
2. Turn cardboard pieces into basic shapes (oval face, crescent ears, rectangle neck) for the positive space (face) of the portrait sculptures
3. Use needle tools to draw facial features (oval eyes, round nose, thin mouth) within the silhouette of the Paolozzi Relief Sculptures
Day Two, Art Start
1. Retrieve Paolozzi Relief Sculptures for Assigned Tables
2. Mechanized Head (1993) Eduardo Paolozzi

3. Discussion Questions "How do artists communicate ideas? Why did the artist use symmetrical pieces? what was the artist inspired by? What is the difference between relief sculpture and a sculpture in the round? What elements and principles did the artist use in his sculpture? Who wears many faces? What does this mean? How do individuals who were different faces represent this in his or her life? How do you bond pieces of cardboard together? How do you know a piece of artwork is finished? Why do artists create self portraits? Does the way a person is sitting or standing tell you anything about them? What makes this portrait unique? Do you like the way the artist arranged the portrait? What does the background and the objects in the background of the picture tell us?"
Lesson Activities
1. Add line types (horizontal, vertical, diagonal) within the positive space (silhouette) of the portrait sculptures
2. Turn cardboard pieces into basic shapes (oval face, crescent ears, rectangle neck) of the portrait sculptures
3. Use needle tools to draw facial features (oval eyes, round nose, thin mouth) with the positive space (silhouette) of the Paolozzi Relief Sculptures
Day Three, Art Start
1. Retrieve Paolozzi Relief Sculptures for Assigned Tables
2. Set Up Studio Area (glue sticks, scissors, cardboard, tempera paint)
Lesson Activities
1. Add color combinations (analogous, complementary, secondary) to the positive space (neck, head, shoulder) of the portrait sculptures
2. Add color combinations (analogous, complementary, secondary) to the negative space (background) of the portrait sculptures
3. Apply Gloss Finish to the face proportions, facial features, and accessories of the Paolozzi Relief Sculptures
Artist Examples


 Student Examples



Friday, October 27, 2023
PAPER QUILLING RELIEF SCULPTURES
Paper Quilling Relief Sculptures

Learning Targets
I can...
- Create an original Paper Quilling Relief Sculpture using sculpture techniques learned in class
- Use line types (horizontal, vertical, diagonal), form (two dimensional, three dimensional), and texture (actual, visual, implied) inspired by Paper Illustrator (1983-Present) Yulia Brodskaya
- Use paper techniques (coils, scrolls, waves, diamonds) and design principles (composition, movement, contrast) based on Modern Art
- Define Quilling (the art of manipulating and arranging small strips of paper into detailed designs)
Lesson One
Day One, Art Start
1. The Heart Alchemist (2023) Yulia Brodskaya


2. Read Paper Quilling Chinese Style by Paper Arts Museum Zhu Ligun

3. Discussion Questions "What shapes can you identify in this composition? How might you be able to get sharp corners in quilled paper? What kinds of designs can you imagine with quilled paper? What are some common things that we find in the springtime? What things in nature are a sign of spring? Are there animals or insects that you see in springtime? How long do you think it took the artist to learn how to paper quill? What type of quilling tools do artists use to create artwork? How do you know what size to make loose coils? What do artists use to coat the finished quilling? How do artists store quilling paper? How can you make something look three dimensional? How many different ways can you fold paper? Can you work as a team to complete the sculpture?"
Lesson Activities
1. Choose 12" by 15" Colored Construction Paper
2. Use three compositional elements (shape, color, texture) to represent a memory, place, or even for the paper sculptures
3. Use line variation (coils, scrolls, waves, diamonds) as a design principle (balance, movement, repetition) within the Paper Quilling Relief Sculptures
Day Two, Art Start
1. Retrieve Paper Quilling Relief Sculptures for Assigned Tables
2. Vrubel Tribute (2023) Yula Brodskaya


3. Discussion Questions "What do you think is happening in this composition? How does this work make you feel? What do you see in this sculpture? How would you describe the composition? Does this work look natural, representational, or is it stylized? What materials were on hand for the creation of this artwork? What does this tell us about the environment in which it was made? Who is the artist of each sculpture? What do you know about this artist? What medium was it done with? Why was it made, is it known? For what purpose or use does the sculpture have? What feeling was each artist trying to convey? How did the artist accomplish this composition? What do these sculptures reveal about the artist or style? What does the sculpture represent? What do you think is happening in this sculpture?"
Lesson Activities
1. Use compasses, protractors, and texture plates to add symmetrical shapes and expressive lines to the paper sculptures
2. Use color combinations (neutral colors, analogous colors, metallic colors) to fill in the negative space (background) of the paper sculptures
3. Use color combinations (neutral colors, analogous colors, metallic colors) to fill in the positive space foreground) of the Paper Quilling Relief Sculptures
Day Three, Art Start
1. Retrieve Paper Quilling Relief Sculptures for Assigned Tables
2. Set Up Studio Area (glue sticks, construction paper, scissors)
Lesson Activities
1. Use scissors to cut out two dimensional shapes (circle, diamond, oval, triangle) to create the positive space (foreground) of the paper sculptures
2. Glue down three dimensional shapes (cylinder, cone, sphere) to create the positive space (foreground) of the paper sculptures
3. Use sharpie markers to add beautiful patterns (hearts, swirls, dots, stripes) within the positive space (foreground) of the Paper Quilling Relief Sculptures
Artist Examples


 Student Examples


 Posts
Posts

