Monday, September 25, 2023
PIET MONDRIAN ANIMALS
Piet Mondrian Animals

Learning Targets
I can...
- Create an original Piet Mondrian Animals using paintings techniques learned in class
- Use line types (horizontal, vertical, diagonal), primary colors (red yellow blue), and shape variation (geometric, organic, free form) inspired by Dutch Artist (1872-Present) Piet Mondrian
- Use art element color (primary colors, red, yellow, blue) and design principles (repetition, composition, contrast) based on Modern Art
- Define Neoplasticism (a style of painting using only vertical lines, horizontal lines, and rectangular shapes in primary colors)
Lesson One
Day One, Art Start
1. Composition No. II (1920) Piet Mondrian

2. Read Piet Mondrian: The Man Who Changed Everything by Waanders Uitgevers Zwolle

3. Discussion Questions "How did Piet Mondrian come to paint this way? How did you choose the placement of colors? What colors do you notice first in the artist's paintings? What she is the largest colored shape? What size is the smallest? What is the most space you have between colored shapes? What is the least? Can you see the shape of a tree in this painting? What makes Piet Mondrian artwork abstract? Is Mondrian thinking about similar things in his artwork? What do you think Piet Modniran is trying to express? How is Piet Mondrian's artwork different from other artists?"
Lesson Activities
1. Choose 12" X 15" Painting Paper
2. Add line types (horizontal vertical diagonal) to the positive space (animal) of the Piet Mondrian Animals
3. Outline line types (horizontal, vertical, diagonal) with neutral colors (black, grey, white) for the positive space (animal) of the Piet Mondrian Animals
Day Two, Art Start
1. Retrieve Piet Mondrian Animals for Assigned Tables
2. Composition A (1923) Piet Mondrian

3. Discussion Questions "Who was Piet Mondrian? What do you notice in this painting Piet Mondrian created? What is Piet Mondrian the founder of? Where was Piet Mondrian born? What shapes did Mondrian mainly use in his paintings? How did Piet Mondrian create straight lines? Who introduced Mondrian to art? How did Piet Mondrian's artwork evolve from 1908 to 1912? What school did Piet Mondrian attend? How did Mondrian's artwork change overtime? What style did Mondrian paint his artwork in? What are movement is Modern Art characterized by? What is the title of this painting?"
Lesson Activities
1. Use primary colors (red yellow blue) to fill in the positive space (animal) of the Piet Mondrian Animals
2. Use primary colors (red yellow blue) to fill in the negative space (background) of the Piet Mondrian Animals
3. Use colored construction paper (blue, red, yellow) to fill in the negative space (background) of the Piet Mondrian Animals
Day Three, Art Start
1. Retrieve Piet Mondrian Animals for Assigned Tables
2. Set Up Studio Area (water bucket, paint brushes, tempera paint)
Lesson Activities
1. Add highlights (reflective light, light source) to fill in the positive space (animal) of the Piet Mondrian Animals
2. Add shadows (reflective shadow, cast shadow) to fill in the negative space (background) of the Piet Mondrian Animals
3. Add details (whiskers, claws, spots, eyelashes) to the positive space (animal) of the Piet Mondrian Animals
Artist Examples
 Student Examples


Thursday, October 28, 2021
CHRIS UPHUES INSPIRED HEARTS
Chris Uphues Inspired Hearts

Learning Targets
I can...
- Create an original Chris Uphues Inspired Hearts using drawing techniques learned in class
- Use shape variation (geometric, organic), line types (horizontal, vertical, diagonal), and space (positive, negative) inspired by American Artist (1994-Present) Chris Uphues
- Use printmaking techniques (woodcut, etching, engraving) and design principles (balance, composition, gradation) based on Contemporary Art
- Define Symbol (a material object representing or standing for something abstract)
Lesson One
Day One, Art Start
1. Lemon-hearted (2018) Chris Uphues

2. Read Beautiful Days by Chris Uphues

3. Discussion Questions "What is going on in this artwork? What was your first reaction to this artwork? what do we know about the artist after viewing this artwork? What do you think the artist is trying to say in this artwork? What emotions do you notice in the artwork? What emotions do you feel when looking at this artwork? How did the artist use line, shape, and color to contribute to the mood or meaning? How might you feel differently about the world after looking at this artwork?"
Lesson Activities
1. Choose 10" X 10" Black Construction Paper
2. Use template to trace a geometric shape (heart, flower, star) in the center of the Black Construction Paper
3. Use black sharpie marker to outline various lines (horizontal, vertical, diagonal) for the positive space (foreground) of the Chris Uphues Inspired Hearts
Day Two, Art Start
1. Retrieve Chris Uphues Inspired Hearts for Assigned Table
2. 5028 York Boulevard Los Angeles (2018) Chris Uphues

3. Discussion Questions "What pieces were you drawn to the most? Why were you drawn tot these pieces? What are some elements that tie the artist pieces together (bold colors, big shapes, simple patterns, black outlines)? What would you change if you were the artist? What do you feel the artist is trying to accomplish with this piece? What types of media does the artist use? What, if anything, do the pieces remind you of? What about this artwork is something you have seen or experienced before?"
Lesson Activities
1. Use black oil pastel to outline various lines (horizontal, vertical, diagonal) of the positive space (foreground) of the heart designs
2. Use warm colors (red orange yellow) to fill in the positive space (heart) of the Chris Uphues Inspired Hearts
3. Use cool colors (blue green purple) to fill in the negative space (background) of the Chris Uphues Inspired Hearts
Day Three, Art Start
1. Retrieve Chris Uphues Inspired Hearts for Assigned Table
2. Set Up Studio Area (tempera paint, water bucket, paint brushes)
Lesson Activities
1. Add highlights (reflective light, light source) to the positive space (heart) of the Chris Uphues Inspired Hearts
2. Add shadows (cast shadow, shadow) to the negative space (background) of the Chris Uphues Inspired Hearts
3. Add embellishments (found objects, decorations, glitter) to the positive shape (heart) and negative space (background) of the Chris Uphues Inspired Hearts
Artist Examples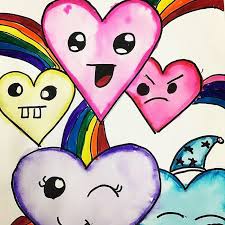

Student Examples


Tuesday, July 27, 2021
LAUNDRY LINES
Laundry Lines

Learning Targets
I can...
- Create an original Laundry Lines using painting techniques learned in class
- Use line types (horizontal vertical diagonal), complementary colors (red green; blue orange; yellow purple), and space (positive negative) inspired by American Folk Artist (1860-1961) Grandma Moses
- Use drawing techniques (horizon line landscapes perspective) and design principles (balance proportion composition) based on Naive Art
- Define Narrative (a story or description of actual or fictional events)
Lesson One
Day One, Art Start
1. Taking In The Laundry (1951) Grandma Moses

2. Read Grandma Moses by Alexandra Wallner

3. Discussion Questions "Did you know she didn't start painting until she was seventy? Why did the artist like to draw happy, colorful scenes? How does Grandma Moses stitches contribute to the unity of this work? Where did Grandma Moses use diminishing perspective in this painting? Where can you find a pattern that repeats? How did Grandma Moses use stack perspective here? Could you figure out he story of this painting if you didn't know the title? Where did Grandma Moses use tints of color in this painting? What color repeats to move your eye around the painting?"
Lesson Activities
1. Use a ruler, compass, or straightedge to draw the scenery of the landscape drawings
2. Add details (trees, buildings, animals) within the background of the landscape paintings
3. Use colored sharpies to outline the foreground, middle ground, and background of the Laundry Lines
Day Two, Art Start
1. Retrieve Laundry Lines for Assigned Table
2. Wash Day (1945) Grandma Moses

3. Discussion Questions "What color repeats to move your eye around the painting? Where did Grandma Moses use tints? How do we know that the light green fields are farther way from us than the darker green ones? Where did Grandma Moses create atmospheric perspective? What repeating elements can you find in this painting? How does the color green contribute to the unity? Do you think it is easier to paint on a stretched canvas or on a board? How many different tints of green do you think Grandma Moses had to mix to paint this scene? What do you think Grandma Moses was trying to say with this painting? Does this little town look like some place where you would like to love or just visit? How is unity achieved in this painting?"
Lesson Activities
1. Add patterns (stars stripes swirls) to the positive space (clothing) of the landscape paintings
2. Use complementary colors (red green; blue orange; yellow purple) to fill in the negative space (background) of the landscape paintings
3. Use complementary colors (red green; blue orange; yellow purple) to fill in the positive space (foreground) of the Laundry Lines
Day Three, Art Start
1. Retrieve Laundry Lines for Assigned Table
2. Set Up Studio Area (watercolor, oil pastels, paint brushes)
Lesson Activities
1. Add highlights (sunlight, reflective light) within the scenery of the landscape paintings
2. Add shadows (cast shadow, reflective shadow) within the scenery of the landscape paintings
3. Add details (snowflakes, tractors, animals) within the positive space (foreground) of the Laundry Lines
Artist Examples


 Student Examples


Wednesday, September 9, 2020
ALPINE TREES
Alpine Trees

Learning Targets
I can...
- Create an original Alpine Tree using collage techniques learned in class
- Use line types (horizontal, vertical, diagonal), shape variation (geometric, organic, free form), and space (positive negative) inspired by Vincent Van Gogh, Gustav Klimt, and Egon Schiele
- Use collage techniques (overlapping, layering, cropping) and design principles (composition, variation, proportion) based on Modern Art
- Define Symbol (mark, sign, or word that indicates, signifies, or is understood as a represented idea)
Lesson One
Day One, Art Start
1. Olive Tree With Yellow Sky And Sun (1889) Vincent Van Gogh

2. Read The Night Before Christmas: A Visit From St. Nicholas by Clement Clarke Moore

3. Discussion Questions "Which real life person is Santa Claus based on? What did you like best about meeting Santa? What was your favorite Christmas activity? What was your favorite present? Who did you spend Christmas Day with? What did you do together on Christmas? What do you love mom about Christmas? What is your favorite Christmas song? What do we celebrate Christmas? What part of the Christmas story do you like the most? What do you like most about Christmas? What is your favorite ornament on the tree and why? What do you think your Christmas tree would say if it could talk? What are you looking forward to about Christmas? What is your favorite Christmas tradition? What does Christmas mean to you? What is the best gift you have ever given? What is the best gift you have ever received? What is one word to describe last year?"
Lesson Activities
1. Choose 12" by 15" Construction Paper
2. Draw three thumbnail sketches of tree compositions using drawing techniques (blending, smudging, smooth) for tree collages
3. Add details (leaves, acorn, hole) for the positive space (tree) of the tree collages
Day Two, Art Start
1. Retrieve Alpine Trees for Assigned Table
2. Autumn Landscapes With Four Trees (1885) Vincent Van Gogh

3. Discussion Questions "What kind of tree is this? How old is the tree? What season is it? Has anyone tried cutting it down? What else grows nearby? Who waters the tree? Does the tree get enough sunlight? Is the tree healthy? What is a tree a symbol of? Where is the tree located? If you were in the picture, where would you be? Did you enjoy creating a tree that represented you? What makes a good scientific sketch? What details were important to include in each tree? How tall do you think the tree is? Have you noticed how different the forest looks through the different seasons? If you climbed to the top of that tree and looked around, what do you think you would be able to see from there?"
Lesson Activities
1. Use drawing techniques (blending, smudging, smoothing) to add basic shapes (geometric, organic, free form) to tree for tree collages
2. Use design principles (composition, repetition, gradation) to fill in the positive space (trunk, branches, twigs) of tree collages
3. Use drawing techniques (blending, smudging, smoothing) to add details (bark, hole, leave) to tree collages
Day Three, Art Start
1. Retrieve Alpine Trees for Assigned Table
2. Set Up Studio Area (scissors, glue sticks, construction paper)
Lesson Activities
1. Use earth tones (green blue brown) to fill in the positive space (foreground) of the tree collages
2. Use earth tones (green blue brown) to fill in the negative space (background) of the tree collages
3. Add design details (birds owls bat) to the positive space (foreground) of the Alpine Trees
Artist Examples


 Student Examples


 Posts

