Paolozzi Relief Sculptures

Learning Targets
I can...
- Create an original Paolozzi Relief Sculptures using sculptures techniques learned in class
- Use line types (horizontal, vertical, diagonal), shape variation (geometric, organic, free form), and space (positive, negative) inspired by Scottish Artist (1924-2005) Sir Eduardo Paolozzi
- Use paper methods (cutting, folding, binding, layering) and design principles (balance, contrast, proportion) based on Pop Art
- Define Identity (the qualities, beliefs, personality traits, appearance, and expressions that characterize a person or group)
Lesson One
Day One, Art Start
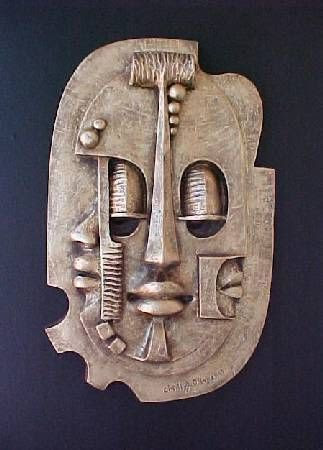
1. Head (1993) Eduardo Paolozzi

2. Read Eduardo Paolozzi by Judith Collins

3. Discussion Questions "Who was Eduardo Paolozzi? Can you find the following items in this Paolozzi collage? What is a relief sculpture? How can everyday materials and simple paper be used to create a relief sculpture? What does this sculpture communicate about the people who made it? What does this artwork communicate about the culture? What might sculpture, and art in general, tell us about the time, places, and culture they come from? What does your sculpture tell people about you, your time, your place, and your culture? What do these sculptures say, and how do they talk to each other? Is this sculpture a high or a low relief sculpture? Is one more than the other? What do you notice about this relief sculpture? Who or what is featured on this relief sculpture?"
Lesson Activities
1. Add lines (horizontal, vertical, diagonal) for the proportion (head, neck, shoulder) within the silhouette of the portrait sculptures
2. Turn cardboard pieces into basic shapes (oval face, crescent ears, rectangle neck) for the positive space (face) of the portrait sculptures
3. Use needle tools to draw facial features (oval eyes, round nose, thin mouth) within the silhouette of the Paolozzi Relief Sculptures
Day Two, Art Start
1. Retrieve Paolozzi Relief Sculptures for Assigned Tables
2. Mechanized Head (1993) Eduardo Paolozzi

3. Discussion Questions "How do artists communicate ideas? Why did the artist use symmetrical pieces? what was the artist inspired by? What is the difference between relief sculpture and a sculpture in the round? What elements and principles did the artist use in his sculpture? Who wears many faces? What does this mean? How do individuals who were different faces represent this in his or her life? How do you bond pieces of cardboard together? How do you know a piece of artwork is finished? Why do artists create self portraits? Does the way a person is sitting or standing tell you anything about them? What makes this portrait unique? Do you like the way the artist arranged the portrait? What does the background and the objects in the background of the picture tell us?"
Lesson Activities
1. Add line types (horizontal, vertical, diagonal) within the positive space (silhouette) of the portrait sculptures
2. Turn cardboard pieces into basic shapes (oval face, crescent ears, rectangle neck) of the portrait sculptures
3. Use needle tools to draw facial features (oval eyes, round nose, thin mouth) with the positive space (silhouette) of the Paolozzi Relief Sculptures
Day Three, Art Start
1. Retrieve Paolozzi Relief Sculptures for Assigned Tables
2. Set Up Studio Area (glue sticks, scissors, cardboard, tempera paint)
Lesson Activities
1. Add color combinations (analogous, complementary, secondary) to the positive space (neck, head, shoulder) of the portrait sculptures
2. Add color combinations (analogous, complementary, secondary) to the negative space (background) of the portrait sculptures
3. Apply Gloss Finish to the face proportions, facial features, and accessories of the Paolozzi Relief Sculptures
Artist Examples


 Student Examples