Monday, August 25, 2025
COW JUMPING OVER THE MOON COLLAGES
Cow Jumping Over The Moon Collages Learning Targets

I can...
- Create an original Cow Jumping Over The Moon Collages using drawing techniques learned in class
- Use color combinations (warm colors, cool colors, neutral colors), value (lightness, darkness, tone), and texture (visual, actual, implied) inspired by American Author (1865-1919) Frank Baum
- Use collage techniques (juxtaposition, layering, composition) and design principles (variation, emphasis, movement) based on American Literature
- Define Material (the supplies used to create an artwork (paper, fabric, glitter, foil)
Lesson One
Day One, Art Start
1. Study Of A Cow (1822-1899) Rosa Bonheur

2. Read The Cow Tripped Over The Moon by Tony Wilson

3. Discussion Questions "What do you think the cow looks like when it jumps over the moon? What kind of moon do you imagine it is? What do you win the cow was thinking before it jumped? What sound did the cow make as it went over the moon? What happened after the cow jumped over the moon? Where di the cow go next? If you could jump over the moon, what would be the first thing you would do? What would you need to build to help a cow jump over the moon? What would a cow need to survive in space? How would the cow get back down to earth? What other silly or impossible things happen in nursery rhymes? How might this nursery rhyme connect to other stories or poems you know?"
Lesson Activities
1. Choose a cow reference photograph for the positive space (foreground, drawing, animal) of the Cow Jumping Over The Moon Collages
2. Use line types (horizontal, vertical, diagonal) to fill in the positives space (foreground, animal, drawing) of the Cow Jumping Over The Moon Collages
3. Use line types (horizontal, vertical, diagonal) to fill in the negative space (background, night sky, galaxy) of the Cow Jumping Over The Moon Collages
Day Two, Art Start
1. Retrieve Cow Jumping Over The Moon Collages for Assigned Tables
2. Sketches Of Cows (1865-1899) Rosa Bonheur

3. Discussion Questions "What materials and techniques need you use? What was challenging of rewarding about the process? Why did you choose these colors, shapes, lines, or textures? What was your inspiration for this artwork? How did you feel when making this artwork? How do you hope other will feel when they look at your work? What title would you give your artwork? Why would you give this title to your artwork? What would you change about your piece? Where would you like to display your artwork? What can you tell me about your artwork? What was your inspiration for this artwork? What did you struggle with as you were making this artwork? Where would you like to display your artwork?"
Lesson Activities
1. Draw a light outline of the selected cow reference for the positive space (foreground, drawing, animal) onto the watercolor paper
2. Use graphic techniques (engraving, carving, scratching) with a stylus to add highlights (light source, reflective light) to the Cow Jumping Over The Moon Collages
3. Use graphic techniques (engraving, carving, scratching) with a stylus to add shadows (reflective light, cast shadow) to the Cow Jumping Over The Moon Collages
Day Three, Art Start
1. Retrieve Cow Jumping Over Moon Collages for Assigned Tables
2. Set Up Studio Area (oil pastels, watercolor, glue sticks, foil, glitter)
Lesson Activities
1. Use graphic techniques (engraving, carving, scratching) with a stylus to finish adding details (clouds, stars, shooting stars) to the Cow Jumping Over The Moon Collages
2. Add value (lightness, darkness, highlights, shadows) to the positive space (foreground, animal, drawing) of the Cow Jumping Over The Moon Collages
3. Add details (clouds, stars, shooting stars) using illustrative techniques (hatching, stippling, cross hatching) to the final Cow Jumping Over The Moon Collages
Artist Examples


 Student Examples


Tuesday, August 19, 2025
ALEXANDER CALDER PRIMARY PAINTINGS
Alexander Calder Primary Paintings Learning Targets

I can...
- Create an original Alexander Calder Primary Painting using drawing techniques learned in class
- Use line types (horizontal, vertical, diagonal), shape variation (geometric, organic, free form), and space (positive, negative) inspired by American Artist (1898-1976) Alexander Calder
- Use primary colors (red, yellow, blue) and design principles (composition, balance, movement) based on Modern Art
- Define Abstract Art (form of art does not represent objects or scenes from the real world in a recognizable way)
Lesson One
Day One, Art Start
1. Black Dots (1974) Alexander Calder

2. Read One And Other Numbers With Alexander Calder by Phaidon

3. Discussion Questions "Did you know Alexander Calder was an American artist known for his pioneering work in kinetic sculpture and mobiles? Did you know he worked as an engineer before studying art and creating signature abstract sculptures? How is this artwork different from the images you have seen of traditional paintings? Does this artwork still look like it might move or would want to move? How would this artwork look if it could move? If you could travel back in time to visit with the artist in the studio, what do you think you would see? If you could travel back in time to visit with the artist, what do you think he would say? Is the subject recognizable, abstract, or realistic? Was Alexander Calder's simple composition in his artwork considered a good representation of abstract art?"
Lesson Activities
1. Choose 12" X 15" Drawing Paper
2. Add geometric shapes (triangles, circles, square, rectangles) to the composition of the Alexander Calder Primary Paintings
3. Add line types (horizontal, vertical, diagonal) in the negative space (background) of the Alexander Calder Primary Paintings
Day Two, Art Start
1. Retrieve Alexander Calder Primary Paintings for Assigned Tables
2. Jungle (1971) Alexander Calder

3. Discussion Questions "What is the difference between aesthetic theories? Can artwork be explained by more than one aesthetic theory? How does an artist's intent influence the interpretation of the artwork? Why is it important to understand the time period of an artist when looking at their artwork? How can personal artwork be inspired by ideas explored by past artists? Why is problem solving an integral part of the art making process? How can students use general knowledge and art knowledge to further develop personal art making? What is abstract art? What do you think abstract means? Can you recognize anything in this painting? What emotion is being conveyed in this painting? Which artwork is abstract? Which work is abstract? What does this artwork remind you of? What do you think this artwork is made of? Does this work follow any mathematical principles?"
Lesson Activities
1. Use primary colors (red yellow blue) to fill in the positive space (foreground, geometric shapes) of the Alexander Calder Primary Paintings
2. Use primary colors (red yellow blue) to fill in the negative space (background, geometric shapes) of the Alexander Calder Primary Paintings
3. Use shape variation (geometric, organic, free form) to fill in the positive space (foreground, geometric shapes) of the Alexander Calder Primary Paintings
Day Three, Art Start
1. Retrieve Alexander Calder Primary Paintings for Assigned Tables
2. Set Up Studio Area (tempera paint, paint brushes, watercolor)
Lesson Activities
1. Add highlights (reflective light, light source) to the subject matter (geometric shapes, foreground) of the Alexander Calder Primary Paintings
2. Add shadows (cast shadow, shadow) to the negative space (background, geometric shapes) of the Alexander Calder Primary Paintings
3. Outline details (geometric shapes, line thickness) in the positive space (foreground, geometric shapes) of the Alexander Calder Primary Paintings
Artist Examples 


 Student Examples


Thursday, August 14, 2025
DOODLE GRID MURAL
Doodle Grid Mural Learning Targets

I can...
- Create an original Doodle Grid Mural using drawing techniques learned in class
- Use shape variation (geometric, organic, free form), space (positive, negative), and value (lightness, darkness) inspired by Multidisciplinary Artist (1995-Present) Bjarni Wark
- Use squiggle techniques (symbols, images, shapes, letters, numbers) and design principles (repetition, proportion, contrast) based on Public Art
- Define Mural (large scale artwork painted or applied onto a wall, ceiling, or other permanent surfaces)
Lesson One
Day One, Art Start
1. Large Scale Portrait (2024) Bjarni Wark

2. Read Usborne: Lots Of Things To Doodle by Simon Tudhope and Krysta Ellis

3. Discussion Questions "What are some similarities and differences between these examples of previous murals? Have we worked on similar projects before? How would you describe the design process from initial concept to completion? How does the artist handle revisions to the design of the mural? How does the artist approach translating the design onto the wall? Does the artist create digital mockups or sketches to visualize the mural on the wall? What style of mural does the artist specialize in: realism, abstract, or illustrative? What materials does the artist use to create the mural on the wall? What is the theme or idea you noticed for this mural? How do artist ensure murals will be durable and long-lasting? What is your experience with public art? What advantages does doodle grid method have over traditional grid method? How do artists use the doodle grid method effectively with digital tools? How does the doodle method help with maintaining proportions and accuracy when scaling up artwork?"
Lesson Activities
1. Choose five "2 X 2" doodles (symbols, letters, numbers, shapes) to add to roll paper
2. Use protractor, straight edge, and compass to draw lines to help divide the sections (facial features, neck, shoulders, hair) of each location
3. Write name next to each five "2 X 2" doodle before beginning to add to Doodle Grid Mural
Day Two, Art Start
1. Retrieve five "2 X 2" doodles (symbols, letters, numbers, shapes) for Assigned Tables
2. Magic Hour (2023) Max Sansing

3. Discussion Questions "How can the power of doodling be harnessed to help us create, develop, and file confident in our original ideas? How can doodles be note-taking images? What is the relationship between word and image? How can doodles be developed? How can doodles stay doodles? How does the doodle method compare to using a projector for mural scaling? What do you think are the most common mistakes artists make when using the doodle grid method? What are the advantages and disadvantages to traditional square grid compared to doodle grid? How did you decide where to draw your doodles? What do you see when you look at the finished artwork? What does this artwork remind you of? Do you think this method would be helpful for drawing other things?"
Lesson Activities
1. Fill in the negative space (background, middle ground, shadow) with primary colors (red, blue, yellow) of the Doodle Grid Mural
2. Fill in the positive space (facial features, hair style, shoulders) with neutral colors (black, grey, white) of the Doodle Grid Mural
3.Write personal signature in the negative space (background, shadows) of Doodle Grid Mural
Day Three, Art Start
1. Retrieve "2 X 2" doodles (symbols, shapes, numbers, letters) for Assigned Tables
2. Set Up Studio Area (sharpie markers, chalk sticks, watercolor paint, tempera paint)
Lesson Activities
1. Outline personal signatures with primary colors (red yellow blue) three times before beginning to add to Doodle Grid Mural
2. Use highlights (reflective light, light source) to fill in the positive space (foreground, portrait) of the Doodle Grid Mural
3. Use shadows (cast shadow, shadow) to fill in the negative space (background) of the Doodle Grid Mural
Artist Examples


Student Examples


Thursday, December 19, 2024
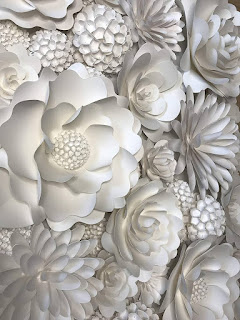
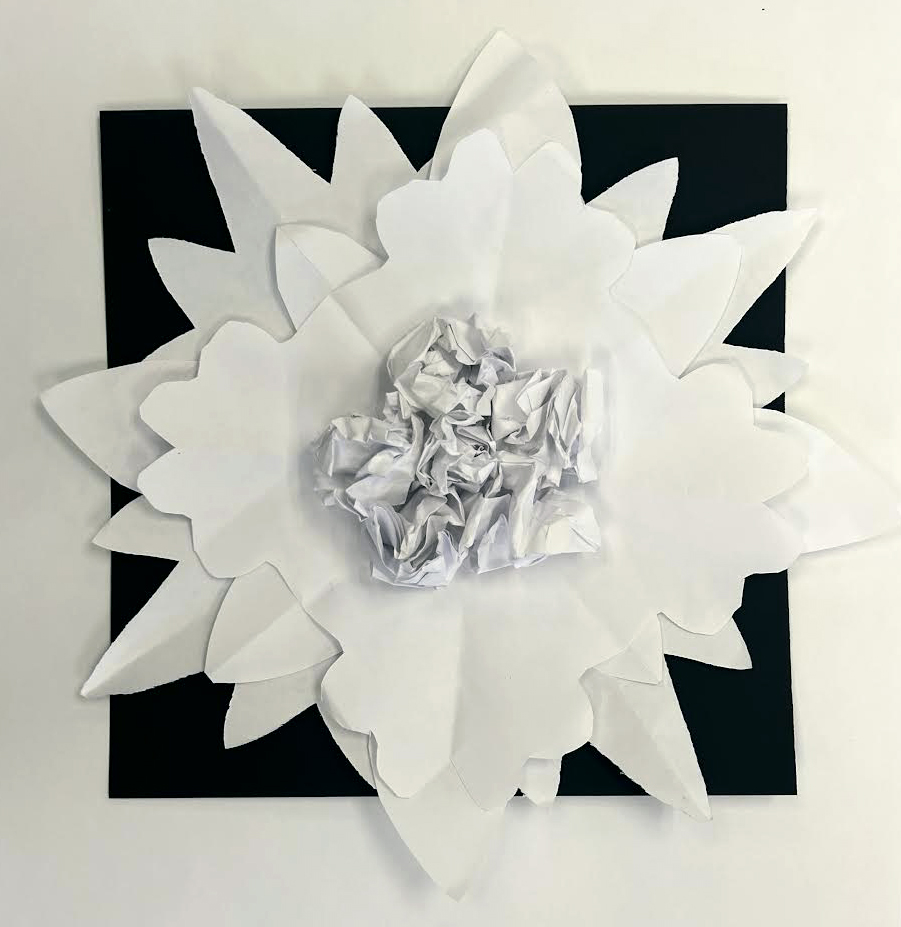
PAPER FLOWER SCULPTURES
Paper Flower Sculptures

Learning Targets
I can...
- Create an original Paper Flower Sculptures using sculpture techniques learned in class
- Use shape variation (geometric organic free form), form (two dimensional, three dimensional), and texture (actual visual implied) inspired by American Sculptor (1998-Present) Kirsten Hassenfeld
- Use paper techniques (folding tearing bending curling) and design principles (proportion composition movement) based on American Art
- Define Curvesto (to create shadows within the sculpture)
Lesson One
Day One, Art Start
1. In The Moon (2007) Kirsten Hassenfeld

2. Read Have You Ever Seen A Flower by Shawn Harris

3. Discussion Questions "How do artists use paper, a two-dimensional object, to create a three-dimensional sculpture using a series of techniques? What do you think are important features of a flower and what shapes do these features take in your mind? Why are flowers such as Van Gogh's Sunflowers to Georgie O'Keefe series a favorited subject among painters? How does the artistic process parallel the development of a flower? How do visual methods help you better understand the functions of each plant part? After learning these visual art terms such as symmetry and balance, how do they contribute to the structure of a flower? How do you see the flowers functioning in a positive manner on these parade floats? What was the key thing you needed to keep in mind when creating your own sculpture? What did you find challenging about your artwork?"
Lesson Activities
1. Choose 12 X 12 Colored Construction Paper
2. Use three compositional elements (shape color texture) to select a flower to represent a memory, place, or event for flower sculptures
3. Use line variation (wavy, straight, curved) as a design principles (balance, movement, repetition) within the flower sculptures
Day Two, Art Start
1. Retrieve Paper Flower Sculptures for Assigned Tables
2. Blue Horn (2010) Kirsten Hassenfeld

3. Discussion Questions "Who is the artist of each sculpture? What do you know about him or her? what is the subject matter? When was this sculpture completed for and for whom (if known)? What medium was it done with? Why was it made, is it known? For what purpose or use does the sculpture have? How are these sculptures similar or different? What feeling do each of these sculptures reveal about the artist and style? What does these sculptures reveal about the artist? What does this piece reveal about the society in which they were created? What does this sculpture represent? What do you hink is happening in this sculpture? What action do you see and how does it contribute to the feeling of this piece? How is the artist telling us a story?"
Lesson Activities
1. Use compasses, protractors, and texture plates to add symmetrical shapes (circle, triangle, square) and expressive lines (straight, curved, swirling) to the paper flower sculptures
2. Use neutral colors (black, white, grey) to fill in the negative space (background) of the paper flower sculptures
3. Use neutral colors (black, white, grey) to fill in the positive space (foreground) of the Paper Flower Sculptures
Day Three, Art Start
1. Retrieve Paper Flower Sculptures for Assigned Tables
2. Set Up Studio Area (construction paper, clear tape, pencils, tempera paint)
Lesson Activities
1. Use scissors to cut out two dimensional symmetrical shapes (circle, triangle, rectangle) to create a three dimensional shape paper flower sculptures
2. Glue down three dimensional symmetrical shapes (cylinder, sphere, cone, pyramid) to create a three dimensional shape paper flower sculptures
3. Use sharpie markers to add beautiful patterns (hearts, stripes, swirls) within the positive space (flower) of the Paper Flower Sculptures
Artist Examples

 Student Examples


Thursday, November 21, 2024
WOODY CRUMBO DANCING DEER
Woody Crumbo Dancing Deer Learning Targets

I can...
- Create an original Woody Crumbo Dancing Deer using drawing techniques learned in class
- Use line types (horizontal, vertical, diagonal), color combinations (analogous, primary, metallic), and space (positive, negative) inspired by Native American Artist (1912-1989) Woody Crumbo
- Use movement (physical, implied, rhythm) and design principles (composition, proportion, arrangement) based on American Art
- Define Kiowa Style (a flat figurative style characterized by solid color fields, minimal backgrounds, flat perspective, and emphasis on dancing)
Lesson One
Day One, Art Start
1. Three Leaping Blue Deer and Three Blue Birds (1912) Woody Crumbo

2. Read Woody Crumbo by Robert S. Cross

3. Discussion Questions "How does his artwork record the customs, traditions, and legends of American culture? Did you know this incredible artist was a humanitarian, flute player, and ceremonial dancer? Do you believe his dream came true of bringing Native American art forms to mainstream culture? How does the artist capture movement of these animals with lines and patterns? Did you know he was an orphann who worked hard to become an artist? Did you know he has the largest collection of artwork in Oklahoma and was added into the Oklahoma Hall of Fame for his kind personality? Do you believe he found a way to honor, promote, and preserve history with his paintings? Did you know Woody Crumbo was an art teacher who wanted to bring recognition to Native American art?"
Lesson Activities
1. Choose 12" X 15" Drawing Paper
2. Use line types (horizontal, vertical, diagonal) to fill in the positive space (animal, foreground, deer) of the dancing deer
3. Outline line types (horizontal, vertical, diagonal) with cool colors (blue, green, purple) of the Woody Crumbo Dancing Deer
Day Two, Art Start
1. Retrieve Woody Crumbo Dancing Deer for Assigned Tables
2. Winter Scene (1935) Woody Crumbo

3. Discussion Questions "How does the artist show a deer in this painting? Can you think of other ways to make a picture of a deer? What colors do you think the artist would have used if this was made from a different material? Can you find other animals in this artwork? How do deer impact the environment? What events were happening in the world at the time when this piece was created? How is the location of this piece significant? What is the subject matter? What is the artist known for? What animal represents your personality? What things do you like about yourself? When you think of a deer, what characteristics would describe the animal? How do animals look different when we draw them whimsically rather than realistically? How does adding bright colors make the artwork feel to you? Do bright colors give the composition movement?"
Lesson Activities
1. Use cool colors (blue, green, purple) to fill in the positive space (foreground, animal, deer) of the dancing deer
2. Use cool colors (blue, green, purple) to fill in the negative space (background, plants, wildlife) of the dancing deer
3. Use metallic colors (bronze, gold, silver) to add patterns (stripes, swirls, dots) to the positive space (foreground) and negative space (background) of the Woody Crumbo Dancing Deer
Day Three, Art Start
1. Retrieve Woody Crumbo Dancing Deer for Assigned Tables
2. Set Up Studio Area (black construction paper, oil pastels, metallic paint)
Lesson Activities
1. Add highlights (reflective light, light source) to fill in the positive space (foreground) of the dancing deer
2. Add shadows (cast shadow, reflective shadow) to fill in the negative space (background) of the dancing deer
3. Add details (plants, floral motifs, patterns) to the positive space (foreground) and negative space (background) of the Woody Crumbo Dancing Deer
Artist Examples
 Student Examples


