Wednesday, August 27, 2025
ONE POINT SHAPE PERSPECTIVES
One Point Shape Perspectives Learning Targets

I can...
- Create an original One Point Shape Perspectives using drawing techniques learned in class
- Use shape variation (geometric, organic, free form), line types (horizontal, vertical, diagonal), and form (two dimensional, three dimensional) inspired by Impressionist Painter (1848-1894) Gustave Caillebotte
- Use core drawing techniques (scale, simple forms, spatial relationships) and design principles (proportion, variation, contrast) based on Impressionism
- Define Vanishing Point (a point where parallel lines appear to converge in the distance)
Lesson One
Day One, Art Start
1. The Bridge Of Europe (1876-1877) Gustave Caillebotte

2. Read The Mysteries of Harris Burdick by Chris Van Allsburg

3. Discussion Questions "Which direction are the lines facing in all the examples (vertical, horizontal, perspective, diagonal)? Do you see any lines that do not follow these rules? What art skills, subject area, or big idea is being taught? How does this art skill translate into an everyday life skill? Which sides of the object would be visible and which sides of the object would be hidden? What knowledge do my students need to possess to create a one point perspective drawing? Are there cultures that did not use linear perspective? Where do you think the road goes to in the distance? What happens to things as they get further away from you? Where would you have to look to see the very end of a long hallway? How can we make our drawings look like they have depth? Why do things in the distance look smaller than things that are close to you? Do you see any lines that look like they are going far, far away?"
Lesson Activities
1. Use three geometric shapes (cylinder, cone, pyramid) to represent a mood (happy, angry, sad) for the shape perspectives
2. Use tints (white grey black) to fill in the positive space (foreground, three dimensional shapes) for the shape perspectives
3. Use tints (white grey black) to fill in the negative space (background) of the One Point Shape Perspectives
Day Two, Art Start
1. Retrieve One Point Shape Perspectives for Assigned Tables
2. Paris Street, Rainy Day (1877) Gustave Caillebotte

3. Discussion Questions "What colors are being used in this artwork? Which area of the artwork is emphasized by the artist? Which part of the art is most important? How did the artist use space? How did the artist use balance? How did the artist use proportion? How would you describe this artwork to someone who has never seen it? What do we know about the artist after viewing this artwork? Who do you think this artwork was created for? Why do you say that? How do you think that artist feels about the final product? How do you think this artwork was made? Why do you think this artwork was made? Why do you think this artist created this work? What emotions do you notice in this artwork? What emotions do you feel when looking at this? How do you think the artist was feeling when he created this artwork? How did the artist use line, shape, and color to contribute to the mood or meaning? What title would you give this artwork?"
Lesson Activities
1. Add three different lines (horizontal, vertical, diagonal) to add visual interest in the shape perspectives
2. Use colored construction paper to fill in the positive space (foreground, three dimensional shapes) of the shape perspectives
3. Use colored construction paper to fill in the negative space (background) of the One Point Shape Perspectives
Day Three, Art Start
1. Retrieve One Point Shape Perspectives for Assigned Tables
2. Set Up Studio Area (paper cut outs, rulers, geometric shape templates, pencils, erasers)
Lesson Activities
1. Use black sharpie markers to outline the three dimensional shapes (cylinder, cone, pyramid) and line types (horizontal, vertical, diagonal) of the shape perspectives
2. Use color combinations (analogous, secondary, complementary) to fill in the positive space (foreground, three dimensional shapes) of the shape perspectives
3. Use color combinations (analogous, secondary, complementary) to fill in the negative space (background) of the One Point Shape Perspectives
Artist Examples


 Student Examples


Thursday, August 14, 2025
DOODLE GRID MURAL
Doodle Grid Mural Learning Targets

I can...
- Create an original Doodle Grid Mural using drawing techniques learned in class
- Use shape variation (geometric, organic, free form), space (positive, negative), and value (lightness, darkness) inspired by Multidisciplinary Artist (1995-Present) Bjarni Wark
- Use squiggle techniques (symbols, images, shapes, letters, numbers) and design principles (repetition, proportion, contrast) based on Public Art
- Define Mural (large scale artwork painted or applied onto a wall, ceiling, or other permanent surfaces)
Lesson One
Day One, Art Start
1. Large Scale Portrait (2024) Bjarni Wark

2. Read Usborne: Lots Of Things To Doodle by Simon Tudhope and Krysta Ellis

3. Discussion Questions "What are some similarities and differences between these examples of previous murals? Have we worked on similar projects before? How would you describe the design process from initial concept to completion? How does the artist handle revisions to the design of the mural? How does the artist approach translating the design onto the wall? Does the artist create digital mockups or sketches to visualize the mural on the wall? What style of mural does the artist specialize in: realism, abstract, or illustrative? What materials does the artist use to create the mural on the wall? What is the theme or idea you noticed for this mural? How do artist ensure murals will be durable and long-lasting? What is your experience with public art? What advantages does doodle grid method have over traditional grid method? How do artists use the doodle grid method effectively with digital tools? How does the doodle method help with maintaining proportions and accuracy when scaling up artwork?"
Lesson Activities
1. Choose five "2 X 2" doodles (symbols, letters, numbers, shapes) to add to roll paper
2. Use protractor, straight edge, and compass to draw lines to help divide the sections (facial features, neck, shoulders, hair) of each location
3. Write name next to each five "2 X 2" doodle before beginning to add to Doodle Grid Mural
Day Two, Art Start
1. Retrieve five "2 X 2" doodles (symbols, letters, numbers, shapes) for Assigned Tables
2. Magic Hour (2023) Max Sansing

3. Discussion Questions "How can the power of doodling be harnessed to help us create, develop, and file confident in our original ideas? How can doodles be note-taking images? What is the relationship between word and image? How can doodles be developed? How can doodles stay doodles? How does the doodle method compare to using a projector for mural scaling? What do you think are the most common mistakes artists make when using the doodle grid method? What are the advantages and disadvantages to traditional square grid compared to doodle grid? How did you decide where to draw your doodles? What do you see when you look at the finished artwork? What does this artwork remind you of? Do you think this method would be helpful for drawing other things?"
Lesson Activities
1. Fill in the negative space (background, middle ground, shadow) with primary colors (red, blue, yellow) of the Doodle Grid Mural
2. Fill in the positive space (facial features, hair style, shoulders) with neutral colors (black, grey, white) of the Doodle Grid Mural
3.Write personal signature in the negative space (background, shadows) of Doodle Grid Mural
Day Three, Art Start
1. Retrieve "2 X 2" doodles (symbols, shapes, numbers, letters) for Assigned Tables
2. Set Up Studio Area (sharpie markers, chalk sticks, watercolor paint, tempera paint)
Lesson Activities
1. Outline personal signatures with primary colors (red yellow blue) three times before beginning to add to Doodle Grid Mural
2. Use highlights (reflective light, light source) to fill in the positive space (foreground, portrait) of the Doodle Grid Mural
3. Use shadows (cast shadow, shadow) to fill in the negative space (background) of the Doodle Grid Mural
Artist Examples


Student Examples


Saturday, March 22, 2025
CLAY ALIEN SCULPTURES
Clay Alien Sculptures Learning Targets

I can...
- Create an original Clay Alien Sculpture using ceramic techniques learned in class
- Use shape variation (geometric, organic, free form), form (two dimensional, three dimensional), and texture (actual, visual, implied) inspired by UFO newspaper clippings
- Use sculpture techniques (carving, casting, modeling, assembling) and design principles (balance, proportion, emphasis) based on Extraterrestrial Art
- Define Anthropomorphic (a depiction of non-human entities (animals, objects, deities) with human characteristics, traits, behaviors, or appearances)
Lesson One
Day One, Art Start
1. The Annunciation With Saint Emidius (1486) Carlo Crivelli

2. Read Aliens Love Underpants by Claire Freedman

3. Discussion Questions "What signs of life do scientists use to look for life in other worlds? What traits will your alien have to survive various environmental conditions? Do you believe we are the only living beings in the universe? If we are not, what does life look like on other planets? Do you think similar characteristics would be needed for plant or animal life on another planet? What can you add to your space ship to make it a place you and your friend would feel safe? What could you add to your spaceship to make it a place you and your friends would feel conformable traveling in? What do you think it would be like to leave Earth and travel to far away planets? Which activities would you explore with your friends and how might you go about them in space? What would you bring with you when meeting your new space friend? How would the friends you are travelling with get along with your new space friend? How would the friends you are traveling with get along if there were any struggles? What makes your space friend a good travel buddy to have in your friendship group?"
Lesson Activities
1. Turn clay slab into basic shapes (head, shoulder, neck) for the positive space (foreground, alien) of the Clay Alien Sculptures
2. Use modeling tools to draw features (clothing, jewelry, make up) for the positive space (foreground, alien) of the Clay Alien Sculptures
3. Add lines for the facial features (nose, eyes, mouth) for the positive space (foreground, alien) of the Clay Alien Sculptures
Day Two, Art Start
1. Retrieve Clay Alien Sculptures for Assigned Tables
2. Baptism Of Christ (1710) Aert de Gelder

3. Discussion Questions "Do you think aliens could live on other planets, moon, or even in space? What do scientists think about aliens? Do you think aliens could be similar or different from us? Would aliens be friendly or scary? What would happen if you met an alien? What does the term UFO stand for? What tools do scientists use to find aliens? What is important to you in a friendship? What will you remember most from your imagined journey in space with your friends? Did you learn anything new from your friend? Did they learn anything from you? What can be helpful when we have difficulties with friends? What are some ways you can share and understand different opinions? How can friendships can as we get older?"
Lesson Activities
1. Add lines for proportions (head, neck, shoulders) within the silhouette of the Clay Alien Sculptures
2. Mold clay into basic shapes (oval face, crescent ears, rectangle neck) for the positive space (foreground, alien) of the Clay Alien Sculptures
3. Use needle to draw facial features (eyes, nose, mouth) within the silhouette of the Clay Alien Sculptures
Day Three, Art Start
1. Retrieve Clay Alien Sculptures for Assigned table
2. Set Up Studio Area (water bucket, needle tools, rubber mat)
Lesson Activities
1. Add tempera paint with color combinations (analogous colors, complementary colors, primary colors) to positive space (foreground, alien) of the Clay Alien Sculptures
2. Add tempera paint with color combinations (complementary colors, analogous colors, primary colors) to the negative space (foreground, alien) of the Clay Alien Sculptures
3. Apply Gloss Finish to the facial features, facial proportions, and accessories of the Clay Alien Sculptures
Artist Examples


 Student Examples


Thursday, December 19, 2024
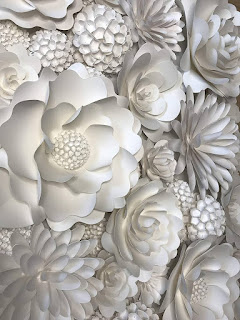
PAPER FLOWER SCULPTURES
Paper Flower Sculptures

Learning Targets
I can...
- Create an original Paper Flower Sculptures using sculpture techniques learned in class
- Use shape variation (geometric organic free form), form (two dimensional, three dimensional), and texture (actual visual implied) inspired by American Sculptor (1998-Present) Kirsten Hassenfeld
- Use paper techniques (folding tearing bending curling) and design principles (proportion composition movement) based on American Art
- Define Curvesto (to create shadows within the sculpture)
Lesson One
Day One, Art Start
1. In The Moon (2007) Kirsten Hassenfeld

2. Read Have You Ever Seen A Flower by Shawn Harris

3. Discussion Questions "How do artists use paper, a two-dimensional object, to create a three-dimensional sculpture using a series of techniques? What do you think are important features of a flower and what shapes do these features take in your mind? Why are flowers such as Van Gogh's Sunflowers to Georgie O'Keefe series a favorited subject among painters? How does the artistic process parallel the development of a flower? How do visual methods help you better understand the functions of each plant part? After learning these visual art terms such as symmetry and balance, how do they contribute to the structure of a flower? How do you see the flowers functioning in a positive manner on these parade floats? What was the key thing you needed to keep in mind when creating your own sculpture? What did you find challenging about your artwork?"
Lesson Activities
1. Choose 12 X 12 Colored Construction Paper
2. Use three compositional elements (shape color texture) to select a flower to represent a memory, place, or event for flower sculptures
3. Use line variation (wavy, straight, curved) as a design principles (balance, movement, repetition) within the flower sculptures
Day Two, Art Start
1. Retrieve Paper Flower Sculptures for Assigned Tables
2. Blue Horn (2010) Kirsten Hassenfeld

3. Discussion Questions "Who is the artist of each sculpture? What do you know about him or her? what is the subject matter? When was this sculpture completed for and for whom (if known)? What medium was it done with? Why was it made, is it known? For what purpose or use does the sculpture have? How are these sculptures similar or different? What feeling do each of these sculptures reveal about the artist and style? What does these sculptures reveal about the artist? What does this piece reveal about the society in which they were created? What does this sculpture represent? What do you hink is happening in this sculpture? What action do you see and how does it contribute to the feeling of this piece? How is the artist telling us a story?"
Lesson Activities
1. Use compasses, protractors, and texture plates to add symmetrical shapes (circle, triangle, square) and expressive lines (straight, curved, swirling) to the paper flower sculptures
2. Use neutral colors (black, white, grey) to fill in the negative space (background) of the paper flower sculptures
3. Use neutral colors (black, white, grey) to fill in the positive space (foreground) of the Paper Flower Sculptures
Day Three, Art Start
1. Retrieve Paper Flower Sculptures for Assigned Tables
2. Set Up Studio Area (construction paper, clear tape, pencils, tempera paint)
Lesson Activities
1. Use scissors to cut out two dimensional symmetrical shapes (circle, triangle, rectangle) to create a three dimensional shape paper flower sculptures
2. Glue down three dimensional symmetrical shapes (cylinder, sphere, cone, pyramid) to create a three dimensional shape paper flower sculptures
3. Use sharpie markers to add beautiful patterns (hearts, stripes, swirls) within the positive space (flower) of the Paper Flower Sculptures
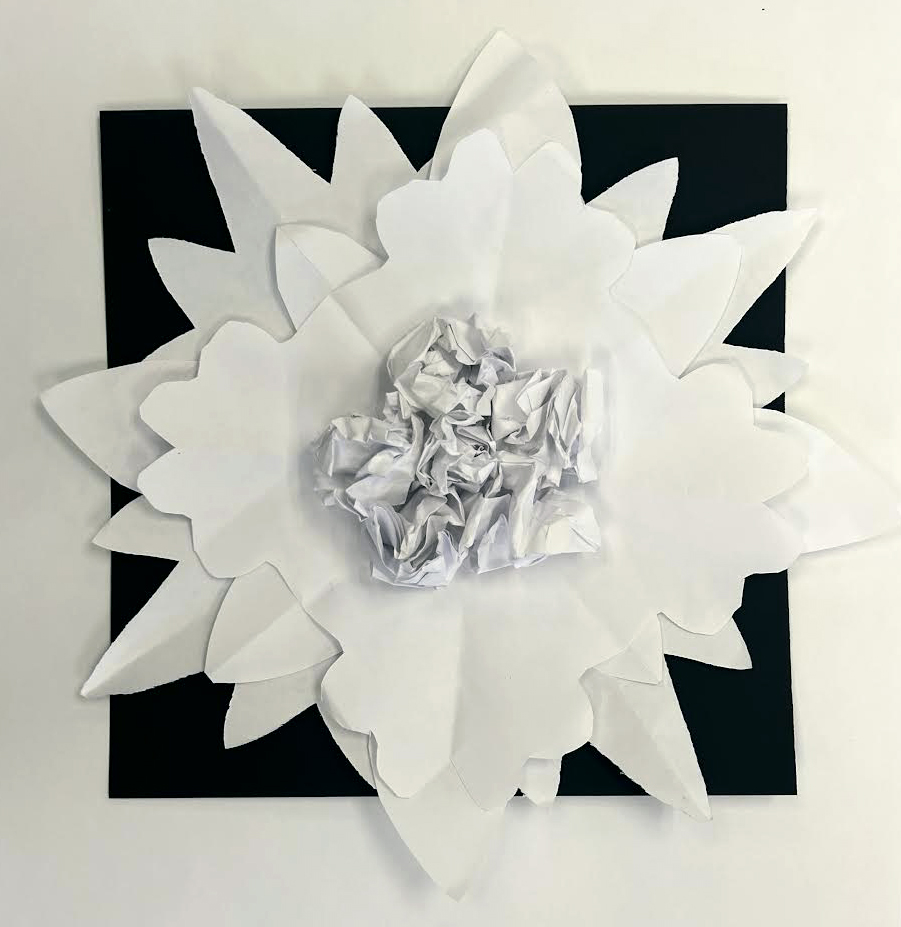
Artist Examples

 Student Examples


Tuesday, November 19, 2024
GRANDMA MOSES INSPIRED FIREPLACES
Grandma Moses Inspired Fireplaces

Learning Targets
I can...
- Create an original Grandma Moses Inspired Fireplaces using drawing techniques learned in class
- Use shape variation (geometric, organic, free form), line types (horizontal, vertical, diagonal), and texture (actual, visual, implied)
- Use painting techniques (wash, wet-on-wet, dry brush, layering) and design principles (composition, movement, proportion) based on American Folk Artist (1860-1961) Grandma Moses
- Define Decorative Art (any type of art concerned with the utility, design, and decoration of objects rather than aesthetic qualities)
Lesson One
Day One, Art Start
1. Christmas At Home (1943) Grandma Moses

2. Read Winter Story by Jill Barklem

3. Discussion Questions "Did you know Grandma Moses did not start painting until she was in her eighties? What are thing you do to never stop learning, growing, or developing new abilities? How is perspective of this artist different from the artists of the Renaissance? Do you think untrained artists can be as talented as trained artists? How will you show firelight within your own artwork? What type of pet would you like to have: a sleeping cat, dog, reindeer, or hippopotamus? What does the fireplace look like in this painting? What do you put in a fireplace to make fire? Do you know what a chimney is any why its it is important?"
Lesson Activities
1. Choose 12" X 15" Painting Paper
2. Use ruler to draw three lines (horizontal, vertical, diagonal) for the interior (window, wallpaper) of the fireplace compositions
3. Use oil pastels to add patterns (swirls, dots, stripes) to the negative space (background) of the Grandma Moses Inspired Fireplaces
Day Two, Art Start
1. Retrieve Grandma Moses Inspired Fireplaces for Assigned Tables
2. Old Times (1957) Grandma Moses

3. Discussion Questions "How did Grandma Moses choose this professional name? Which of these time periods matches Grandma Moses lifetime? At what age did Grandma Moses begin painting? Who was the one that taught Grandma Moses how to paint? Who first discovered and recognized Grandma Moses as an artist? In what art movements is Grandma Moses artwork considered to be apart of? In what American city did Grandma Moses' career take off? What popular children's book did Grandma Moses illustrate? What might you expect to find in a biography about an artist such as Grandma Moses? Why do you think Grand Moses waited until she was a grandmother to paint?"
Lesson Activities
1. Add details (candles, wreaths, stockings, plants) to the positive space (fireplace) of the fireplace compositions
2. Add details (doors, balcony, shudders) to the positive space (interior, foreground) of the fireplace compositions
3. Use collage materials (scissors, glue sticks, fabric) to add details (toys, pets, curtain, trees, rugs) to the negative space (background) of the Grandma Moses Inspired Fireplaces
Day Three, Art Start
1. Retrieve Grandma Moses Inspired Fireplaces for Assigned Tables
2. Set Up Studio Area (oil pastels, tempera paint, paint brushes, water buckets)
Lesson Activities
1. Use tissue paper in warm colors (red, orange yellow) to add texture (actual, visual, implied) to the positive space (plants, fire, snow) of the fireplace compositions
2. Use neutral colors (black, grey, white, brown, tan) to fill in the positive space (fireplace, foreground) of the fireplace compositions
3. Use cool colors (blue, purple, pink) to fill in the negative space (curtains, trees, rugs) of the Grandma Moses Inspired Fireplaces
Artist Examples


 Student Examples


