Tuesday, August 22, 2023
SPLATTERED PAINTBRUSHES
Splattered Paintbrushes

Learning Targets
I can...
- Create an original Splattered Paintbrushes using drawing techniques learned in class
- Use line types (horizontal, vertical, diagonal), space (positive, negative), and texture (rough, smooth, thick, thin) inspired by American Painter (1912-1958) Jackson Pollock
- Use painting techniques (splattering, dripping, brushing) and design principles (movement, variety, unity) based on Abstract Expressionist Movement
- Define Splattering (a painting technique in which paint is flung, with the flick of a brush, onto the painting surface)
Lesson One
Day One, Art Start
1. Number 1 (Lavender Mist) (1950) Jackson Pollock

2. Action Jackson by Jan Greenberg & Sandra Jordan

3. Discussion Questions "What did Jackson Pollock use to splatter paint? What technique did Jackson Pollock use to create his paintings? What was unique about Jackson Pollock's method of painting? How do you splatter paint like Jackson Pollock? What was the first thing you noticed about this painting? What else caught your eye? After looking at this work for a while, close your eyes. What objects or shapes do you remember clearly? Why do you think you remembered what you did? Find a hidden idea in this artwork. What is it, and what clues helped you to find it? If you created a work of art with the same title, what would it look like? What would your secret be, and where would it be kept? What kinds of guardians would you include? What art movement is Jackson Pollock most closely associated with?"
Lesson Activities
1. Use graphite pencil to draw paintbrush types (round, flat, bright, filbert, fan, angle, detail round) for the positive space (foreground) of the paintbrush paintings
2. Use graphite pencil to draw in the negative space (background, shadows, table) of the paintbrush paintings
3. Use graphite pencil to add the details (metal handle, wooden handle, geometric shapes) of the paintbrush types (round, flat, bright, filbert, fan, angle, detail round) of the paintbrush paintings
Day Two, Art Start
1. Retrieve Splattered Paintbrushes for Assigned Table
2. Cathedral (1947) Jackson Pollock

3. Discussion Questions "What type of techniques do you think this artist used? How do you think he made those designs? Do you agree with critics who wonder whether or not Jackson Pollock was the best painter ever? What about Jackson Pollock's work made him controversial? How do you feel about Jackson Pollock's work? Do you consider him an artist? What does it mean for Pollock to have adopted independence instead of his former teacher's style? What was Jackson Pollock's approach to art? How did Jackson Pollock use unique materials in his artwork? Why? How do you see surrealism in Pollock's work? What was Pollock's work like in 1947? Why is this significant? How did this artist contribute to art?"
Lesson Activities
1. Add line types (horizontal, vertical diagonal) to the negative space (background, table, paintbrushes) of the paintbrush paintings
2. Add line types (horizontal, vertical, diagonal) to the positive space (paintbrushes) of the paintbrush paintings
3. Add line types (horizontal, vertical, diagonal) to the positive space (paintbrushes) of the Splattered Paintbrushes
Day Three, Art Start
1. Retrieve Splattered Paintbrushes for Assigned Table
2. Set Up Studio Area (paintbrushes, tempera paint, water bucket)
Lesson Activities
1. Use rainbow order colors (red orange yellow green blue purple) to paint the negative space (background table paintbrushes) of the paintbrush paintings
2. Use rainbow order colors (red orange yellow green blue purple) to paint the positive space (paintbrushes) of the paintbrush paintings
3. Use neutral colors (black brown grey) to paint the negative space (shadows, highlights) of the Splattered Paintbrushes
Artist Examples


 Student Examples


Tuesday, August 2, 2022
MARK ROTHKO COLOR FIELDS
Mark Rothko Color Fields

Learning Targets
I can...
- Create an original Mark Rothko Color Fields using drawing techniques learned in class
- Use color combinations (analogous, complementary, monochromatic), shape variation (geometric, organic), and line types (horizontal, vertical, diagonal) inspired by American Painter (1903-1970) Mark Rothko
- Use value (lightness, darkness) and design principles (gradation, movement, composition) based on Abstract Expressionism
- Define Monochromatic (using only one color)
Lesson One
Day One, Art Start


Lesson Activities
Day Two, Art Start

Lesson Activities
Day Three, Art Start
Lesson Activities
Artist Examples

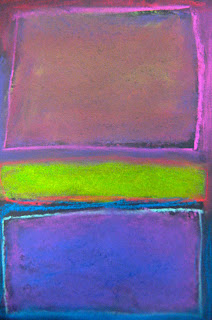


Student Examples 


Thursday, March 26, 2020
AUGUSTE HERBIN ABSTRACT ART
Auguste Herbin Abstract Art

Learning Targets
I can...- Create an original Auguste Herbin Abstract Art from drawing techniques learned in class
- Use geometric shapes (circle, triangle, oval, rectangle), line types (horizontal, vertical, diagonal) and value (lightness, darkness) inspired by French Artist (1882-1960) Auguste Herbin
- Use art element: shape (geometric, organic, biomorphic) and design principles (movement, proportion, gradation) based on Abstract Art
- Define Nonobjective (representing or intended to represent no natural or actual object, figure, or scene)
Lesson One
Day One, Art Start
1. Oiseay (1882-1960) Auguste Herbin

Lesson Activities
1. Use three geometric shapes (circle, oval, rectangle) to represent a title (days, weeks, color) for ones abstract work2. Use tints (white, grey, black) to fill in the positive space (geometric shape) for ones abstract work
3. Use tints (white, grey, black) to fill in the negative space (background) of ones Auguste Herbin Abstract Art
Day Two, Art Start
1. Retrieve Auguste Herbin Abstract Art for assigned table2. Composition Rouge (1949) Auguste Herbin

Lesson Activities
1. Add three different lines (diagonal, vertical, horizontal) to add visual interest within ones abstract work2. Use colored construction paper to fill in the positive space (geometric shape) within ones abstract work
3. Use colored construction paper to fill in the negative space (background) within ones Auguste Herbin Abstract Art
Day Three, Art Start
1. Retrieve Auguste Herbin Abstract Art for Assigned Table2. Set Up Studio Area (construction paper, paper cut outs, geometric shape templates)
Lesson Activities
1. Use black sharpie to draw three geometric shapes (circle, oval, triangle) and line types (horizontal, vertical, diagonal) of ones abstract work2. Use primary colors (red, yellow, blue) to fill in the positive shape (geometric shapes) of ones abstract work
3. Use primary colors (red, yellow, blue) to fill in the negative space (background) of ones Auguste Herbin Abstract Art
Artist Examples


 Student Examples


Sunday, March 11, 2018
CALDER CONTOUR SELF PORTRAITS
Calder Contour Self Portraits

Learning Targets
I can...- Create a Contour Self Portrait using techniques learning in class
- Use gestural lines (smooth, jagged, curved), shape variation (geometric, organic, free form), and color schemes (complimentary, secondary, primary) inspired by American Sculptor (1976-1998) Alexander Calder
- Use observational skills (value scale, proportion, illusion of depth) and design principles (contrast, harmony, movement) relating to Abstract Expressionism
- Define Portrait (a picture depicting the face, head, and shoulder)
Lesson One
Day One, Art Start
1. Abstract Expressionists (1) Alexander Calder, (2) Elizabeth Berrien, and (3) Gavin Worth


Lesson Activities
1. Choose 9" by 12" Drawing Paper2. Use mechanic pencils to draw face, head, and shoulder of oneself
3. Use black sharpie marker to outline face, head, and shoulder of Contour Self Portraits
Reminder:
- Initials & Home Teacher on Back of Paper
Day Two, Art Start
1. Retrieve Contour Self Portrait for Assigned Table2. Read Alexander Calder by PBS American Masters

Lesson Activities
1. Use printed portrait to outline the face, head, and shoulder with black wire2. Use multicolored wire to add facial features (eyebrows, hair, jewelry) to self portraits
3. Use hot glue to attach face, head, shoulder, and facial features to a cardboard base
Day Three, Art Start
1. Retrieve Contour Line Portrait for Assigned Table2. Set Up Studio Area (black wires, wire cutters, cardboard base)
Lesson Activities
1. Use hot glue to finish attaching face, head, and shoulder to cardboard base2. Use black paint to cover facial features (eyebrows, hair, jewelry) of self portraits
3. Use black paint to cover the cardboard base of the Contour Line Portraits
Teacher Demonstration Examples


Artist Examples


Student Examples


 Posts
Posts

