Tuesday, October 8, 2024
MARTA MINUJIN PAPER SCULPTURES
Marta Minujín Paper Sculptures Learning Targets

I can...
- Create an original Marta Minujín Paper Sculptures using drawing techniques learned in class
- Use line types (horizontal, vertical, diagonal, curved), fluorescent colors (neon, orange, yellow, blue, pink, red), and texture (visual, actual, implied) inspired by Contemporary Artist (1943-Present) Martin Minujin
- Use sculpture techniques (carving, assemblage, modeling, casting) and design principles (movement, balance, harmony) based on Contemporary Art
- Define Energetic Lines (use curved, diagonal, or zigzag lines to give a painting a feeling of energy or movement)
Lesson One
Day One, Art Start
1. Bland Geometry (2014) Marta Minujin

2. Read Marta Minujín: Arte! Arte! Arte! by Darsie Alexander and Rebecca Shaykin

3. Discussion Questions "Who is Martin Minujin? Wha are other non-proper art materials (mattresses, cardboard boxes, sidewalk) could you use as an artist? What logos, advertisements, and texts appear to have influenced her work? Do you think you would enjoy visiting her artwork? Do you like the idea of art that you can interact with or play in or on? Do you think it changes how you think about art? Did you know for her seventieth birthday she decided to marry art? Why does the artist us many colors in her artwork?"
Lesson Activities
1. Choose 12" X 12" Colored Fluorescent Paper
2. Use three compositional elements (shape, color, line, texture, value, space, form) to represent a important memory, place, or event
3. Use line variation (horizontal, vertical, diagonal, curved) as design principle (balance, movement, repetition) within the Martin Minujin Paper Sculptures
Day Two, Art Start
1. Retrieve Marta Minujín Paper Sculptures for Assigned Tables
2. Aura And Wind (2018) Marta Minujin

3 Discussion Questions "How can you make something three dimensional? How many different ways can you fold paper? Can you work as a team to complete your sculpture? What do you think is happening in this composition? How does this work make you feel? What do you see in this sculpture? How would you describe this composition? Does this work look natural, representational, or stylized? What materials were on hand for the creation of this artwork? What does this tell us about the environment in which it was made?"
Lesson Activities
1. Use compasses, protractors, and texture plates to add symmetrical shapes (square, rectangle, trapezoid) and expressive lines (horizontal, vertical, diagonal) to the paper sculptures
2. Use color combinations (analogous, complementary, fluorescent) to fill in the negative space (background) of the paper sculptures
3. Use color combinations (analogous, complementary, fluorescent) to fill in the positive space (foreground) of the Marta Minujín Paper Sculptures
Day Three, Art Start
1. Retrieve Marta Minujín Paper Sculptures for Assigned Tables
2. Set Up Studio Area (glue sticks, construction paper, markers, scissors)
Lesson Activities
1. Use scissors to cut out two dimensional symmetrical shapes (square, rectangle, circle) to create a three dimensional paper sculptures
2. Glue down two dimensional symmetrical shapes (square, rectangle, circle) for a simplified paper sculptures
3. Use sharpie marker to add beautiful patterns (hearts, swirls, dots) to the positive space (foreground) of the Marta Minujín Paper Sculptures
Artist Examples


 Student Examples


Thursday, February 27, 2020
ART SUPPLIES STILL LIFE DRAWINGS
Art Supplies Still Life Drawings

Learning Targets
I can...- Create an original Art Supplies Still Life Drawing using drawing techniques learned in class
- Use fluorescent colors (pink, yellow, green, blue, orange), line types (horizontal, vertical, marvel), and value (lightness, darkness) inspired by Conceptual Artist (1941-Present) Michael Craig Martin
- Use drawing skills (intensity, illusion of depth, observational) and design principles (movement, proportion, gradation) based on Contemporary Art
- Define Hierarchy (objects that are closer to the viewer are lower on the paper)
Lesson One
Day One, Art Start
1. Scissors (Wallpaper Aqua) (2004) Michael Craig-Martin
2. Fan (2002) Michael Craig Martin

Lesson Activities
1. Choose 12" X 15" Drawing Paper2. Add three dimensional shapes (cylinder, pyramid, sphere) to composition of arranged objects (pencils, scissors, markers)
3. Use black sharpie markers to add line types (thick, thin) to composition of arranged objects (pencils, scissors, markers)
Day Two, Art Start
1. Retrieve Art Supplies Still Life Drawing for Assigned Table2. Portrait (Paintbrushes) (2000) Michael Craig-Martin

Lesson Activities
1. Use fluorescent colors (green, orange, pink, turquoise, yellow, red) to fill in the positive space (arranged objects) of the Art Supplies Still Life Drawings2. Use fluorescent colors (green, orange, pink, turquoise, yellow, red) to fill in the negative space (background) of the Art Supplies Still Life Drawings
3. Use shape stamps to add patterns (floral, silk, wood) to the Art Supplies Still Life Drawings
Day Three, Art Start
1. Retrieve Art Supples Still Life Drawing for Assigned Table2. Set Up Studio Area (markers, erasers, felt pens, pencils)
Lesson Activities
1. Add highlights (reflective light, light source) to subject matter (arranged objects) of Art Supplies Still Life Drawings2. add shadows (cast shadow, shadow) to negative space (background) of Art Supplies Still Life Drawings
3. Outline details (pattern, arranged objects) in foreground (art supplies) of Art Supplies Still Life Drawings
Artist Examples


 Student Examples


Wednesday, January 30, 2019
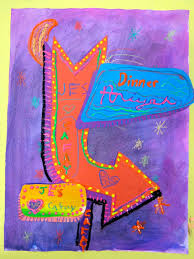
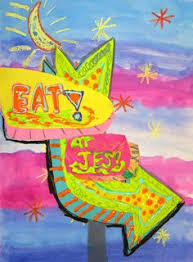
NEON SIGNS
Neon Signs

Learning Targets
I can...- Create original Neon Sign using painting techniques learned in class
- Use fluorescent colors (green, red, orange, yellow), shape variation (geometric, organic), and value (highlights, shadows) inspired by Minimalist Artist (1933-1996) Dan Flavin
- Use scientific connections (electrodes, noble gases, ultraviolet light) and design principles (rhythm, unity, emphasis) based on Installation Art
- Define Sign (a written or symbolic form of displaying information)
Lesson One
Day One, Art Start
1. Untitled 3 (for Leo Castelli at his 30th Gallery Anniversary) (1989) Dan Flavin
Lesson Activities
1. Choose 12" X 15" Painting Paper2. Use contour line to add exterior details (stainless steel, art deco, glass trim) to neon sign drawings
3. Add implied texture (glass tube, metal design) to interior design of neon sign drawings
Day Two, Art Start
1. Retrieve Neon Sign for Assigned Table2. Untitled (To Veronique) (1987) Dan Flavin

Lesson Activities
1. Use permanent marker to outline the contour lines of the neon sign drawings2. Add fluorescent colors (red, green, yellow, orange) to positive space (sign, decor) of neon sign drawings
3. Add fluorescent colors (red, green, yellow, orange) to negative space (background, clouds) of neon sign drawings
Day Three, Art Start
1. Retrieve Neon Sign for Assigned Table2. Set Up Studio Area (watercolor pencils, water bucket, paintbrush)
Lesson Activities
1. Use value to add highlights (reflective light, moonlight) to neon sign drawings2. Use value to add shadows (cast shadow) to Dan Flavin Inspired Neon Signs
3. Use metallic colored pencils (silver, platinum, gold) to add finishing details (bolts, decorations, pattern) to Neon Signs
Artist Examples


Student Examples


Tuesday, January 29, 2019
GLOW IN THE DARK SYMMETRICAL INSECTS
Glow In The Dark Symmetrical Insects

Learning Targets
I can...- Create an imaginary symmetrical insect using line (vertical, parallel), analogous colors (red, yellow, orange), and organic shapes (wings, antennas, horns) inspired by American Artist (1928-1987) Andy Warhol
- Use design principles (balance, rhythm, movement) relating to the Pop Art Movement
- Define Symmetry (same on both sides)
Day One, Art Start


Lesson Activities
2. Use pencils to draw contour lines of insects (lady bug, butterfly, spider) onto drawing paper
3. Use permanent marker to outline contour lines of insects (lady bug, butterfly, spider)
Reminder:
- Initials & Home Teacher on Back of Paper
Day Two, Art Start
Lesson Activities
1. Add line variation (horizontal, vertical, diagonal) to create patterns within the insect template2. Use analogous colors (green, yellow, orange) to fill in the positive space of their insect
3. Use analogous colors (green yellow orange) to fill in the negative space of their insect
Day Three, Art Start
1. Retrieve Symmetrical Insect for Assigned Table2. Set Up Studio Area (paint brushes, water bucket, painting paper)
Lesson Activities
1. Use value (highlights, reflective light) to add contrast to positive space of Symmetrical Insects2. Use value (cast shadow) to add contrast to negative space of Symmetrical Insects
3. Use implied texture to add details (wings, antennas, whiskers) to Symmetrical Insects
Artist Examples


Student Examples


 Posts
Posts

