Tuesday, September 29, 2026
ELF PORTRAITS
Elf Portraits Learning Targets

I can...
- Create an original Elf Portrait using drawing techniques learned in class
- Use line types (horizontal, vertical, diagonal), shape variation (geometric, organic, free form), and texture (actual visual implied) inspired by American Illustrator (1983-Present) Mary Engelbreit
- Use portrait styles (profile, three-quarter, full face, self-portrait) and design principles (repetition, contrast, balance) based on American Art
- Define Portrait (a picture, painting, photograph, or sculpture of a person that focuses mainly on face and expression)
Lesson One
Day One, Art Start
1. Merry Mushroom Elf (2002) Mary Engelbreit

2. Read "How To Catch An Elf" by Adam Wallace and Andy Elkerton

3. Discussion Questions "What do you know about Christmas? What patterns did you use to create the background of your artwork? What did you add to the clothing to make it appear like it belonged to an elf? What emotions (joy, anger, sadness, gear, surprise) do you feel when you look at your artwork? Why would you make a good elf? What do you notice about an elf's clothing, hat, and shoes? How can we make our elf look unique instead of making every elf the same? How can you use art elements (line, shape, pattern) to decorate an elf? What could you add to the background to tell a story? How could using different colors (warm colors, cool colors, complementary colors) change the personality of the elf? How can artists use line, shape, color, pattern, and imagination to create a unique character? How can artists use facial expressions and body positions to communicate emotion?"
Lesson Activities
1. Choose 12" X 15" Drawing Paper
2. Use graphite pencil to draw line types (horizontal, vertical, diagonal) of facial proportions (head, face, shoulder) of the Elf Portraits
3. Use graphite pencil to add facial features (eyes, nose, mouth, eyebrows) to the positive space (foreground, middle ground, portrait) of the Elf Portraits
Day Two, Art Start
1. Retrieve Elf Portraits For Assigned Tables
2. Christmas Mischief (2023) Mary Engelbreit

3. Discussion Questions "Do you think this artwork is a self-portrait? How does this portrait make you feel? Are you interested in the portrait? Do you like the way the artist has arranged the picture? Do you like the way the artist has shown details? What is a portrait? What does the picture tell you about the time that the subject was made? How do you think the artist felt about the person he or she painted? How do you think the person in this picture is feeling? What is the mood of the person in this picture? Are the lines in the portrait straight or curved? How often does the artist repeat certain colors or shapes within the portrait? What does the background and the objects in the background of the picture tell us? How much space has the artist left around the person? What view of the person is pictured?"
Lesson Activities
1. Add adornments (earrings, jewelry, hairstyles, clothing) to the positive space (foreground, middle ground, portrait) of the Elf Portraits
2. Add costumes (jewelry, clothing, make up) to the positive space (foreground, middle ground, portrait) of the Elf Portraits
3. Use black sharpie marker to outline the facial features (eyes, nose, mouth, ears) and facial proportions (head, face, shoulder) of the Elf Portraits
Day Three, Art Start
Retrieve Elf Portraits for Assigned Tables
2. Set Up Studio Area (glue sticks, scissors, markers, crayons)
Lesson Activities
1. Use color combinations (analogous, complementary, secondary) to fill in the positive space (foreground, middle ground, portrait) of the Elf Portraits
2. Use color combinations (analogous, complementary, secondary) to fill in the negative space (background) of the Elf Portraits
3. Use value (lightness, darkness) to add shadows (reflective shadow, cast shadow) and highlights (reflective light, light source) to the Elf Portraits
Artist Examples


 Student Examples


Tuesday, August 29, 2023
ALPHONSE MUCHA SELF PORTRAITS
Alphonse Mucha Self Portraits

Learning Targets
I can...
- Create an original Alphonse Mucha Self Portrait using drawing techniques learned in class
- Use muted colors (dulled, desaturated, low chroma, grayed), sinuous forms (serpentine, wavy, curved, bends) and patterns (decorative, borders, panels) inspired by Czech Illustrator (1860-1939) Alphonse Mucha
- Use portrait techniques (proportion, composition, lighting, posing) and design principles (movement, rhythm, emphasis) based on Art Nouveau
- Define Art Nouveau (decorative images prominent in early 1890s to the First World War characterized by linear designs and flowing natural shapes)
Lesson One
Day One, Art Start
1. Daydream (Reverie) (1897) Alphonse Mucha

2. How Alphonse Mucha Designed The Nation State Of Czechoslovakia by Smithsonian Magazine: Jimmy Stamp

3. Discussion Questions "What were beauty standards of the early 20th century that Mucha perpetuated through his work? How do they differ from yet inform today's definition of beauty? How did Alphonse Mucah develop a visual language that brought access to beautiful imagery to the masses? How do the advertisements compare to the ones we see today? What did Mucha aim to do through his design style? How does the detailing and imagery on the banknotes convey the personal connection Mucha had with the country? What do you believe is the significance of using floral motifs and young women as part of the design? How are the symbols seen on these banknotes different from the imagery that appears on the United States dollar bills? How might today's viewers interpret the art differently than a member of the original audience? Do you think being a native of the Czech Republic would help to better understand the motifs seen on banknotes and insignias?"
Lesson Activities
1. Choose 12" X 15" Drawing Paper
2. Use graphite pencil to draw line types (contour, outline, continuous) of facial proportions (head, face, shoulder) of self portrait drawings
3. Use graphite pencil to add facial features (eyes, nose, mouth, eyebrows) to the positive space (portrait) of the self portrait drawings
Day Two, Art Start
1. Retrieve Alphonse Mucha Self Portraits for Assigned Tables
2. Slavia (1896) Alphonse Mucha

3. Discussion Question "What is the symbolic significance of these circle motifs? Are they purely decorative additions or do the lilies and laurels serve a purpose? Do you agree that art exists to communicate spiritual messages? What connection does this artwork make between the spiritual and the discipline of musical performance? What sort of overall spiritual message do you think Mucha wanted to communicate with this artwork? Why do you think Mucha displayed the woman like this? What is the symbolism of the vines and foliage entwined in her fingers and surrounding her? What is the mood behind this print and how it is successful as promotional menu? How did the artist use the motifs of hands and snowy branches to convey his meaning? How are these influence apparent in this image? How else are these elements consistent with the Art Nouveau style?"
Lesson Activities
1. Add adornments (piercings, tattoos, hairstyles) to positive space (portrait) of the self portrait drawings
2. Add costumes (jewelry, clothing, make up) to the positive space (portrait) of the self portrait drawings
3. Use black sharpie marker to outline the facial features (eyes, nose, mouth) and facial proportions (head, face, shoulders) of the Alphonse Mucha Self Portraits
Day Three, Art Start
1. Retrieve Alphonse Mucha Self Portraits for Assigned Tables
2. Set Up Studio Area (colored pencils, metallic markers, watercolor)
Lesson Activities
1. Use metallic colors (gold silver bronze) to fill in the positive space (clothing, jewelry, facial features) of the self portrait drawings
2. Use metallic colors (gold silver bronze) to fill in negative space (background) of the self portrait drawings
3. Use value (lightness, darkness) to add shadows (reflective shadow, cast shadow) and highlights (reflective light, light source) to the Alphonse Mucha Self Portraits
Artist Examples


 Student Examples


Thursday, January 12, 2023
REMBRANDT ROYAL PORTRAITS
Rembrandt Royal Portraits

Learning Targets
I can...
- Create an original Rembrandt Royal Portraits using drawing techniques learned in class
- Use line types (contour, outline, continuous), shape variation (geometric, organic, free form), and color combinations (analogous, complementary, secondary) inspired by Dutch Golden Age Painter (1606-1669) Rembrandt
- Use observational drawing techniques (capturing expression, developing likeness, facial placement) and design principles (balance, proportion, contrast) based on Baroque Painting
- Define Self Portrait (a picture of an artist made by an artist)
Lesson One
Day One, Art Start
1. Edward, Prince Of Wales (King Edward VI) (1538) Hans Holbein The Younger

2. A Princess, A Pirate, And One Wild Brother by Cornelia Funke

3. Discussion Questions "What do you notice about the painting? How would you describe the clothing? What do you think the boy's clothing tells us about him? How would you describe the posture and expression? How old do you think the boy in this painting is? What the clues do you notice about the boy? Who might the young boy in the painting be? are these two poses different? How? why do you think the artist chose to pose this toddler as he did? Who might the young boy in this painting be? How do toddlers who are fourteen months normally act? What kinds of clothes would they typically be wearing? What kinds of clothes would you wear? What kind of pose would make you look royal? Would you face forward or sit in profile? Would your hands have a certain gesture? What kind of expression would you have on your face? What would the background look like?"
Lesson Activities
1. Choose 12" X 15" Drawing Paper
2. Use graphite pencil to draw the line types (contour, outline, continuous) of the facial proportions (head, face, shoulders) of the royal portraits
3. Use graphite pencil to add facial features (eyes, nose, mouth, eyebrows) to the positive space (portrait) of the Rembrandt Royal Portraits
Day Two, Art Start
1. Retrieve Rembrandt Royal Portraits for Assigned Table
2. A Young Boy With A Dog (1629-1679) Hendrick Berckman

3. Discussion Questions "Do you think your meanings are going to be the same for someone living at the time this was painted? What symbols do we see around us in everyday life? Where do we see nature symbols used in everyday life? If you had to create a modern royal portrait to convey a public image, which symbols would you include? Are these paintings sympathetic to their subjects? How has the significance of these paintings changed over time? How do these paintings change the way you think about artistic period? What messages do you think are missing? How could those messages be added in these paintings in the form of nature symbols? Why may only showing public image be bad for people's well-being? Why is it important to know who you really are? What could these symbols mean?"
Lesson Activities
1. Add adornments (piercings, hairstyles, wigs) to the positive space (portrait) of the royal portraits
2. Add costumes (jewelry, clothing, make up) to the positive space (portrait) of the royal portraits
3. Use black sharpie marker to outline the facial features (eyes, nose, mouth, eyebrows) and facial proportions (head, face, shoulders) of the Rembrandt Royal Portraits
Day Three, Art Start
1. Retrieve Rembrandt Royal Portraits for Assigned Tables
2. Set Up Studio Area (tempera paint, metallic paint, paint brushes)
Lesson Activities
1. Use primary colors (red yellow blue) to fill in the positive space (clothing, jewelry, facial features) of the royal portraits
2. Use primary colors (red yellow blue) to fill in the negative space (background) of the royal portraits
3. Use value (lightness, darkness) to add shadow (reflective shadow, cast shadow) and highlights (reflective light, light source) of the Rembrandt Royal Portraits
Artist Examples


 Student Examples


Wednesday, October 5, 2022
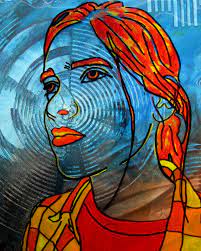
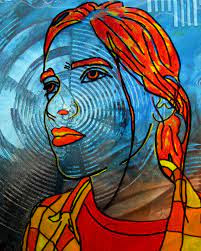
BISA BUTLER SELF PORTRAITS
Bisa Butler Self Portraits

Learning Targets
I can...
- Create an original Bisa Butler Self Portraits using printmaking techniques learned in class
- Use line variation (continuous, contour, outline), shape types (geometric, organic, free form), and texture (actual, implied, visual) inspired by American Fiber Artist (1973-Present) Bisa Butler
- Use drawing techniques (cross hatching, stippling, scribbling) and design principles (balance, portion, harmony) based on Fiber Art
- Define Portrait (a painting or drawing of the face, head, and shoulders)
Lesson One
Day One, Art Start
1. The Tea (2017) Bisa Butler

2. Read "Bisa Butler: Portraits" by Erica Warren

3. Discussion Questions "Do you think this is a self-portrait? How does this portrait make you feel? Are you interested in the portrait? Do you like the way the artist has arranged the picture? Do you like the way the artist has shown details? Can you predict if a male or female artist created this portrait? What is a portrait? Why do artist paint portraits? Who is the person in the portrait? How old is the person? What does the picture tell you about the time that the subject was made? How do you think the artist felt about the person he or she painted? How do you think the person in the picture is feeling? What is the mood of the person in the picture? How can you tell?"
Lesson Activities
1. Choose 12" X 15" Drawing Paper
2. Use graphite pencil to draw line types (contour, outline, continuous) of facial proportions (head, face shoulder) of self portrait
3. Use graphite pencil to add facial features (eyes, nose, mouth, eyebrows) to the positive space (portrait) of the Bisa Butler Self Portraits
Day Two, Art Start
1. Retrieve Bisa Butler Self Portraits for Assigned Tables
2. The Princess (2017) Bisa Butler

3. Discussion Questions "How has the artist arranged the portrait? Do you think the person posted for this portrait? Where is the person looking (at the viewing, away, at something else)? If there is more than one person in the picture, are they touching? What could this mean? What does the background and the objects in the background of the picture tell us? How much space has the artist left around the person? How is the space being used? What view of the person is pictured? Is the portrait realistic or is the portrait abstract? What shapes can you see in this portrait? Are the lines in the portrait straight or curved? How often does the artist repeat certain colors or shapes within the portrait?"
Lesson Activities
1. Add adornments (piercings, tattoos, hairstyles) to the positive space (portrait) of the self portrait
2. Add costumes (jewelry, clothing, make up) to the positive space (portrait) of the self portraits
3. Use black sharpie marker to outline the face features (eyes, nose, mouth) and facial proportions (head, face, shoulder) of the Bisa Butler Self Portraits
Day Three, Art Start
1. Retrieve Bisa Butler Self Portrait for Assigned Table
2. Set Up Studio Area (acetate, sharpie markers, pens)
Lesson Activities
1. Use primary colors (red yellow blue) to fill in the positive space (clothing, jewelry, facial features) of the self portrait
2. Use primary colors (red blue yellow) to fill in the negative space (background) of the self portrait
3. Use value (lightness, darkness) to add shadows (reflective shadow, cast shadow) and highlights (reflective light, light source) to the Bisa Butler Self Portraits
Artist Examples


 Student Examples


Wednesday, September 7, 2022
EMOTION MIRROR FACES
Emotion Mirror Faces

Learning Targets
I can...
- Create an original Emotion Mirror Faces using drawing techniques learned in class
- Use color combinations (secondary, primary, analogous), shape variation (geometric, organic, free form), and space (positive space) inspired by American Painter (1894-1978) Norman Rockwell
- Use symmetry (radial, bilateral, asymmetrical) and design principles (composition, movement, balance) based on American Art
- Define Expression (exploring thoughts, emotions, intuitions, and needs through visual imagery)
Lesson One
Day One, Art Start
1. Triple Self-Portrait (1960) Norman Rockwell

2. Read The Way I Feel by Jana Cain

3. Discussion Questions "What types of lines do you see in the facial expression or body pose (smile, slumped shoulders)? Does the line type change the feeling of the line? Does the line type change the line direction? What facial expression do you know? How do you draw the expression of a face? How do these faces change with this emotion? What does the word emotion mean? What kinds of emotions do we experience on a day-to-day basis? How do certain cools make us feel? Why do these colors make us feel this way? What kine of lines are there (straight, squiggly, wavy)?"
Lesson Activities
1. Choose 12" X 15" Drawing
2. Use drawing techniques (overlapping, cropping, layering) to make shapes (geometric, organic, free form) of emotion mirror drawings
3. Use drawing techniques (blending, attaching, smoothing) to connect details (eyes, mouth, accessories) of Emotion Mirror Faces
Day Two, Art Start
1. Retrieve Emotion Mirror Faces for Assigned Table
2. Girl At Mirror (1954) Norman Rockwell

3. Discussion Questions "How can you show emotion by only using colors and lines? How can you tell that the artist is feeling that way? Can you make a face that shows that feeling? What do you notice first in the picture? Why does it stand out? Is it larger, brighter, or more colorful? Do the people in the artwork look happy or sad? What do you think they are thinking? Who do you think they are? What else is in the artwork? Do you see someone caring for something in this picture? What is the person caring for? How did the artist show that the person cares for their object? How does this one differ from the last one we looked at? How do the colors, lines, shapes, and space in the painting make you feel? Why do you think the artwork makes you feel that way?"
Lesson Activities
1. Use solid colors (blue, brown, green) to fill in the positive space (portrait) of the emotion mirror drawings
2. Use solid colors (blue, yellow, orange) to fill in the negative space (background) of the emotion mirror drawings
3. Use line types (horizontal, vertical, diagonal) to fill in the positive space (portrait) for the Emotion Mirror Faces
Day Three, Art Start
1. Retrieve Emotion Mirror Faces for Assigned Tables
2. Setup Studio Area (tempera paint, paintbrushes, water buckets)
Lesson Activities
1. Add highlights (light source, reflective light) to positive space (portrait) of the emotion mirror drawings
2. Add shadows (cast shadow, shadow) to the negative space (background) of the emotion mirror drawings
3. Use stop motion program (iMotion, FlipaClip, Stop Motion) to add an animation to ones Emotion Mirror Faces
Artist Examples
 Student Examples


 Posts
Posts

